● Tenable Nessus Network Monitor can be used in networks to identify assets, as well as gather cyber risk data.
● Third-party data can be imported for purposes of identify assets within an organization.
Advanced Network Scan Options - Plugins
At the end of this exercise, you will be able to:
● Create a scan with a plugin family enabled
● Perform a remediation scan
● Create a scan with an individual plugin enabled
● Use the Tenable online Plugin Database to research plugins
Part 1: Task 1 - Create a Denials of Service Family Plugin Scan
Log into Tenable Vulnerability Management and create a scan of the plugins in the Denials of Service family.
Step-by-step Instructions:
1. Ensure you are logged into Tenable Vulnerability Management via cloud.tenable.com with the
credentials provided.
2. Click Vulnerability Management .
3. Click Quick Actions and select Create a VM Scan .
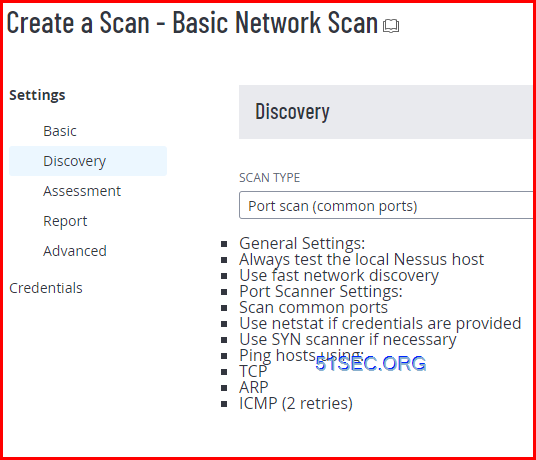
4. Click Advanced Network Scan .
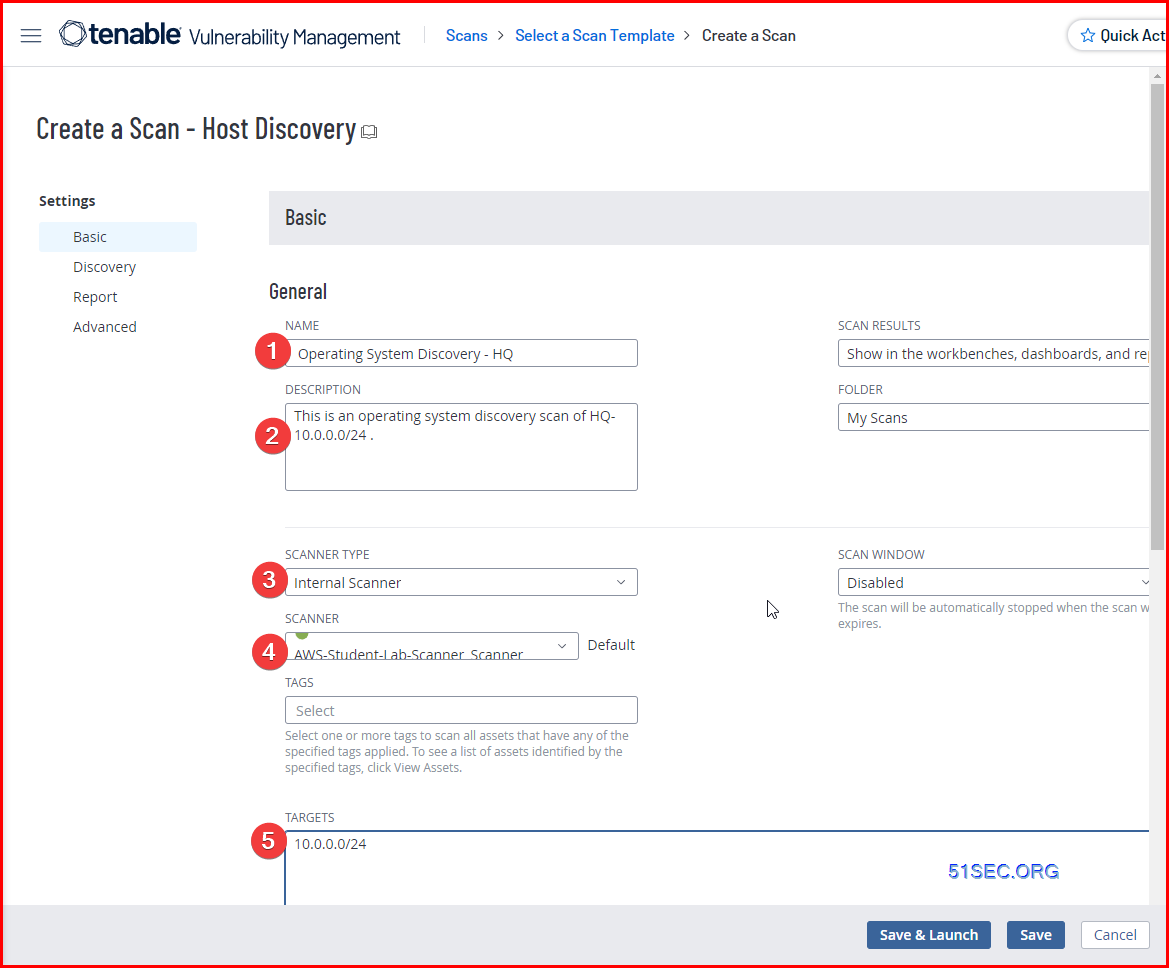
5. Enter DNS Scan HQ in the Name fi
6. Select AWS-Student-Lab-Scanner_Scanner from the Scanner drop-down list.
7. Type 10.0.0.0/24 in the Targets fi
8. Click Plugins on the left.
9. Click the slider to the right of All Enabled to disable all plugins.
10. Click the slider to the right of DNS .
11. Click the slider to the right of General .
12. Click the slider to the right of Service Detection .
13. Click the slider to the right of Settings .
14. Click Save and Launch .
Part 1: Task 2 - Perform a Remediation Scan of a Vulnerability
Locate the SSL Certificate “Cannot be trusted” vulnerability, and perform a remediation scan.
Step-by-step Instructions:
1. Sign into cloud.tenable.com with the credentials provided.
2. Click Vulnerability Management .
3. Click the Menu (located in the upper-right corner) and select Findings .
4. Click on the fi control, and search for and select IPv4 Address .
5. Click on the X to close the fi box.
6. In the IPv4 Address fi type 10.0.0.7 underneath is equal to .
7. Click Apply .
8. Click the Actions menu to the right of one of the SSL Certificate Cannot Be… and select Launch
Remediation Scan .
9. Select AWS-Student-Lab-Scanner_Scanner from the Scanner drop-down list.
10. Click in the Targets fi and replace the contents with 10.0.0.7 .
11. Click Save and Launch .
Part 2: Task 1 - Create a Scan for Expired SSL Certificates
Log into Tenable Vulnerability Management and create a scan for expired SSL certificates using plugin
ID15901.
Step-by-step Instructions:
1. Sign into cloud.tenable.com with the credentials provided.
2. Click Vulnerability Management .
3. Click Quick Actions and select Create a VM Scan .
4. Click Advanced Network Scan .
5. Enter Expired Certificate Scan HQ in the Name fi
6. Select AWS-Student-Lab-Scanner_Scanner from the Scanner drop-down list.
7. Type 10.0.0.0/24 in the Targets fi
8. Click Plugins on the left.
9. Click the slider to the right of All Enabled to disable all plugins.
10. Click General .
11. Type 15901 in the General fi and enter.
12. Check the Status box.
13. Click Save and Launch .
Part 3: Task 1 - Determine whether Plugin 15901 requires credentials
Use tenable.com/plugins to determine whether plugin ID 15901 requires credentials.
Step-by-step Instructions:
1. Go to www.tenable.com/plugins .
2. Type 15901 in the Search fi and press Enter .
3. Click the 15901 ID.
Part 1: Task 1
1. Why enable entire plugin families?
● So that if any new plugins are later added to those families, those vulnerabilities will also be
assessed.
2. Why did we enable the plugin families General, Service Detection and Settings, in addition to DNS?
● These families contain the plugins that give us information on whether or not our scans ran
properly.
Part 1: Task 2
1. Has the vulnerability been remediated?
● No.
2. What are some challenges with performing remediation scans?
(There are several possible answers to this question, here are some examples:)
● You have to remember to select the appropriate scanner.
● You have to remember whether or not the scan requires credentials.
● Scanning for individual vulnerabilities is an ineŨcient use of scanner time.
● When scanning an asset with multiple IPs, you have to make sure you have the right IP address.
Part 2: Task 1
1. How many expired certificates were reported in the scan?
● 0.
Part 3: Task 1
1. How can we determine whether plugin 15901 requires credentials?
● The type is "remote."
2. When was this plugin first published?
● December 3, 2004
Assessment with Agents
Part 1: Task 1 - Create an Agent Group
In order to perform a vulnerability assessment using agents, agents must be placed in an agent group.
Step-by-step Instructions:
1. Ensure you are logged into Tenable Vulnerability Management via cloud.tenable.com with the
credentials provided.
2. Click Vulnerability Management .
3. Click Menu , and then select Settings .
4. Click Sensors from the Scanning section.
5. Click Nessus Agents on the left.
6. Click Agent Groups .
7. Click +Add Agent Group .
8. Type Sales Team in the Group Name fi
9. Click Save .
10. Click Sales Team .
11. Click +Assign Agents .
12. Select both (yourname)_Linux and (yourname)_Windows agents.
13. Click Assign .
Part 2: Task 2 - Create and Launch an Agent Vulnerability Assessment
Once agents have been placed in a group, vulnerability assessments can be performed on those assets.
Step-by-step Instructions:
1. Click Quick Actions and select Create a VM Scan .
2. Click Nessus Agent from the top tabs.
a. Note: The default is on Nessus Scanner.
3. Click Basic Agent Scan .
4. Type Sales Team Vulnerability Assessment in the Name fi
5. Select Sales Team from the Agent Groups drop-down.
6. Select 15 minutes from the drop-down below Scan Type/Scan Window .
7. Click Save & Launch .
Part 1: Task 1
1. How can you determine if a given agent is available to be scanned?
● In the agent group list, check to see if 'Online' is listed, underneath Status.
2. Can an individual agent be in multiple groups?
● Yes.
Part 1: Task 2
1. What impact does reducing the scan window to 15 minutes have on the scan? Why would you want to
change the scan window value?
● By changing the scan window to 15 minutes, if an agent does not connect to Tenable
Vulnerability Management within 15 minutes of the start of the scan, the agent will not be
assessed and will not appear in the results.
○ You can extend the scan window for environments where agent connectivity might be
sporadic, to ensure hosts are assessed. In environments where connectivity is more
reliable, the scan window can be reduced to speed up completion of the scan.
2. Were there any assets with agents that did not get scanned?
● No.
3. Were credentialed checks run?
● Yes. All Agent scans are credentialed scans by default.
Compliance Scans
Part 1: Task 1 - Create a Windows Compliance Scan
Create a compliance scan using a CIS Windows Server 2016 MS audit fi from a template.
Step-by-step Instructions:
1. Ensure you are logged into Tenable Vulnerability Management via cloud.tenable.com with the
credentials provided.
2. Click Vulnerability Management .
3. Click the Quick Actions and select Create a VM Scan .
4. Click Policy Compliance Auditing .
5. Type CIS Windows 2016 in the Name field
6. Click the Scanner drop-down and select AWS-Student-Lab-Scanner_Scanner .
7. Type 10.0.0.0/24 in the Targets field
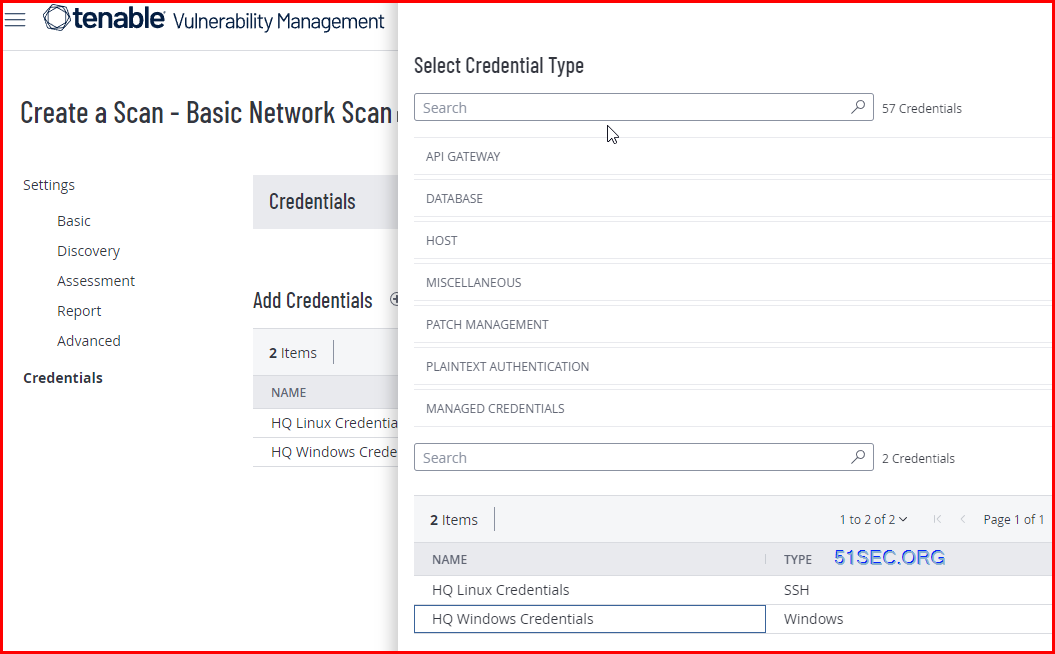
8. Click Credentials from the Scanning section on the left.
9. Click plus sign (+) to the right of Add Credentials .
10. Open the Managed Credentials drop-down from the Select Credential Type panel that expanded on the
right.
11. Click HQ Windows Credentials . (You may need to mouse over the credentials to fi them.)
12. Click the X in the upper right corner of the Select Credential Type panel to close.
13. Click Compliance from the Settings menu located on the left.
14. Click the plus sign (+) to the right of Add Compliance Audits .
15. Type CIS Microsoft Windows Server 2016 MS L1 in the Search fi and press Enter on your keyboard.
16. Select CIS Microsoft Windows Server 2016 MS L1 v2.0.0 from the Windows drop-down.
a. Note: This audit occasionally updates. If the exact match is not available, select whichever
version is the most recent, for example instead of v2.0.0. It may be 2.0.1, or something similar.
17. Add the phrase For Official Use Only in the Logon Window Text field
18. Click Save .
19. Click Save & Launch .
Part 2: Task 1 - Create an Agent Group for Windows Hosts
Create an agent group called Windows Hosts, with the Windows host in the group.
Step-by-step Instructions:
1. Click the Menu button in the upper left corner, and select Settings .
2. Click Sensors .
3. Click Nessus Agents on the left.
4. Click Agent Groups .
5. Click +Add Agent group .
6. Type Windows Hosts in the Group Name fi
7. Click Save .
8. Click the group Windows Hosts .
9. Click Assign Agents .
10. Select {yourname}_Windows .
a. You may need to hover your mouse over the Name to see the full name.
11. Click Assign .
Part 2: Task 2 - Create an Agent Compliance Scan for the Windows Host
Create a CIS 2016 Server Compliance scan that uses the agent.
Step-by-step Instructions:
1. Click Quick Actions and select Create a VM Scan .
2. Click Nessus Agent (at the top).
3. Click Policy Compliance Auditing .
4. Type CIS Windows 2016 Agent in the Name fi
5. Click the Agent Groups drop-down and select Windows Hosts .
6. Click Compliance from the Settings menu located on the left.
7. Click the plus sign (+) to the right of Add Compliance Audits .
8. Type CIS Microsoft Windows Server 2016 MS L1 in the Search fi and press Enter on your keyboard.
9. Select CIS Microsoft Windows Server 2016 MS L1 v2.0.0 (or the latest version) from the Windows
drop-down.
10. Click Save .
11. Click Save & Launch .
Part 1: Task 1
1. Did the scan return any results for hosts other than the Windows Server 2016 host? How could you
create a scan that did not use these results?
● Yes. Scan based upon a tag of Windows Server 2016 hosts, rather than an IP range.
2. How would you adjust this scan to check for your organization’s login banner?
● Edit the scan, go to the Compliance section, and click the CIS entry. Set the login banner on the
right, and save.
Part 2: Task 1
1. How many agent groups is the Windows agent in?
● 2
2. Does this pose any problems or challenges? If so, how might you resolve them?
● Someone might scan the asset twice, if they selected multiple agent groups in one scan. Label
your agent groups to make it clear what they are used for, ex. "Windows_hosts_for_compliance."
Part 2: Task 2
1. Are there any apparent differences between performing a compliance assessment with an agent, as
opposed to an active scan?
● Yes, for an agent compliance assessment you do not have to add credentials, as all agent scans
are credentialed by default.
2. In what cases might you want to use an agent instead of an active scan?
● Transient assets, or assets that have unreliable internet connectivity.
Custom Compliance
At the end of this module, you will be able to:
● Create an audit fi
● Create and launch a compliance scan using a custom audit f
Part 1: Task 1 - Create an Audit File to Check Minimum Password Length on Windows Hosts
Using a text editor, create an audit fi that checks for a minimum password length of 15 characters on
Windows hosts.
Step-by-step Instructions:
1. Open a text editor on your local machine. DO NOT use Windows Notepad , as it inserts extraneous
characters that will interfere with the creation of the audit fi If you don’t have an editor, Vim is freely
available for most platforms, from multiple sources. For Mac, try BBEdit or Sublime Text . On Windows,
search for and install Notepad++ .
2. Create a fi with the following contents:
<check_type:"Windows" version:"2">
<group_policy:"Password Length Compliance check">
<custom_item>
type: PASSWORD_POLICY
description: "Minimum password length"
value_type: POLICY_DWORD
value_data: 15
password_policy: MINIMUM_PASSWORD_LENGTH
</custom_item>
</group_policy>
</check_type>
3. Save the fi as Windows_password.audit .
Part 1: Task 2 - Create a Scan Using the New Audit File
Step-by-step Instructions:
1. Ensure you are logged into Tenable Vulnerability Management via cloud.tenable.com with the
credentials provided.
2. Click Vulnerability Management
3. Click Quick Actions and select Create a VM Scan .
4. Click Policy Compliance Auditing .
5. Type Password Length Check in the Name fi
6. Click the Scanner drop-down and select AWS-Student-Lab-Scanner_Scanner .
7. Type 10.0.0.0/24 in the Targets fi
8. Click Credentials from the Settings menu located on the left.
9. Click the plus sign (+) to the right of Add Credentials .
10. Open the Managed Credentials drop-down from the expanded Select Credential Type panel.
11. Click HQ Windows Credentials . (You may need to mouse over the credentials to fi them.)
12. Click the X in the upper right corner of the Select Credential Type panel to close.
13. Click Compliance from the Settings menu located on the left.
14. Click the plus sign (+) to the right of Add Compliance Audits .
15. Scroll down the list to the right and click the Windows drop-down.
16. Click (Upload a custom Windows audit fi .
17. Click Add File .
18. Locate the fi Windows_password.audit and upload it.
19. Click Save .
20. Click Save & Launch .
Part 1: Task 1
1. What is an easy way to create controls in an audit fi
● Take an existing audit fi look for a similar control and modify it.
2. Did the check give a solution? How would you change the audit fi to provide this information?
(Hint : See page 414 of the Compliance Checks Reference Guide located here .)
● No. Add additional information in the description tag.
Part 1: Task 2
1. Did the Windows server 2016 host pass the control?
● No.
2. What was the minimum password length on the Windows Server 2016 host, vs. the policy value?
● The host minimum password length (output) is 0, and the policy value is 15 characters.
Compliance Analysis
At the end of this module, you will be able to:
● Analyze compliance audit results
● Create an exported report from your failed audit results
Part 1: Task 1 - Create an Exported Report for all Failed Results for a Specific Audit File
Using fi and the export scheduler, create a report that displays only the failed results for a particular
audit fi
Step-by-step Instructions:
1. Ensure you are logged into Tenable Vulnerability Management via cloud.tenable.com with the
credentials provided.
2. Click Vulnerability Management .
3. Click the Menu button to select Findings , under Explore .
4. Click the Host Audits tab.
5. Click the Filter icon to expand the fi control panel.
6. Scroll down to the Result fi and select the checkbox for Failed .
7. Click Select Filters , and select Audit File . Then, click the X.
8. Enter *Server_2016* in the Audit File fi underneath is equal to .
9. Click Apply .
10. Click Saved Filters , and then Save .
11. Enter CIS MS Server 2016 Failed Checks , then click the check mark .
12. Select the checkbox at the top of the list, to the left of {number} Host Audits to select all of the fi
results, and then click Select all [number] host audits .
13. Click Export .
14. Rename the export as MS 2016 Failed Audits .
15. Select CSV format.
16. Click the down arrow next to Configurations .
17. Select Benchmark Version .
18. Click Export .
Optional Advanced Problems
This section is optional and can be completed during any free time you may have available while taking this
course.
TOTAL ESTIMATED OPTIONAL EXERCISE TIME: 30:00 MINUTES
Task 1 - Limit the Scope of a Windows File Contents Search
In a Windows file content search, you can limit which directories are searched by using the directive
include_paths. Refer to the Nessus Compliance Checks Reference Guide . Create an audit file that only
searches c:/windows/users and c:/Documents and Settings for credit card numbers. Then, upload
this audit file to Tenable Vulnerability Management, create a policy and scan companyname-hq.
Note: There are several different ways to complete this task.
Task 2 - Check to Ensure All Windows Hosts in Headquarters are Windows Server 2016
Check to make sure that all the Windows hosts in HQ are Windows server 2016. Hint : The CIS Windows Server 2016 benchmark that was used earlier in this lab has a conditional that can be used to model a check.
Task 3 - Create a Conditional in an Audit File
Create an audit fi that has a control that says, “If the operating system is Windows 2016, then the minimum password length must be 16 characters.”
Answer Key
Part 1: Task 1
1. Is it possible to schedule your export?
● Yes. In the Export pop-out, enable the slider next to schedule .
2. How can you filter on audit checks that are related to passwords?
● Use the Audit Name filter and wildcards. For example, Audit Name is equal to *password* .
Prioritization with VPR
At the end of this exercise, you will be able to:
● Use various tools in Tenable Vulnerability Management to prioritize remediation actions.
Part 1: Task 1 - Create a Filter for VPR 9 or Higher Items
Create a fi for VPR 9 or higher items.
Step-by-step Instructions:
1. Ensure you are logged into Tenable Vulnerability Management via cloud.tenable.com with the
credentials provided.
2. Click the Vulnerability Management tile in the workspace.
3. Click Menu in the upper left corner.
4. Click Findings underneath Explore .
5. Click the Filter icon, underneath Vulnerabilities , to open the Filters panel.
6. Click Select Filters .
7. Search for and select the checkbox next to VPR .
8. Click the X to close the Select Filters pop-out.
9. Click Is Equal to in the VPR fi and select Is Greater Than or Equal To .
10. Type 9 in the fi below.
11. Click Apply .
12. Click Saved Filters (at the top, to the right of the Filter icon) and click Save .
13. Type VPR 9 or Higher Items .
14. Click the check mark .
15. Click the Filter icon to close the Filters panel.
Part 1: Task 2 - Identify and Report on Assets
Now that you have identified the VPR 9 or higher vulnerabilities, you want to know which assets have those
vulnerabilities. Create a report for these assets.
Step-by-step Instructions:
1. Click Asset , next to Group By (at the top, just underneath the Filter icon).
2. Select the checkbox at the top to select all [number] Assets (The exact number may vary slightly in the
lab environment).
a. Note: This will only select the first 50 assets grouped. To select all, click Select all [Number]
assets .
3. Click Export .
4. Change the name to Assets with VPR 9 or Higher .
5. Select CSV .
6. Click to enable the Schedule slider.
7. Click the date and select tomorrow’s date .
8. Click the time , and select midnight .
9. Select your current Timezone .
10. Click Daily and select Weekly on {Day} .
11. Click Schedule Export .
Answer Key
Part 1: Task 1
1. Is the highest VPR item at the top of the list?
● No
2. What other fi is available for sorting on this table?
● Last Seen, Name, Severity
3. How can you change the sort column on the table?
● Click a column header.
Part 1: Task 2
1. When new assets are discovered with VPR 9 or higher items, will they be reported on automatically?
● No, only the selected assets will be reported
CVSS and Advanced Analysis Filters
At the end of this exercise, you will be able to:
● Use various tools in Tenable Vulnerability Management to prioritize remediation actions:
○ Common Vulnerability Scoring System (CVSS) impact analysis
○ Remediation analysis
Part 1 - Impact Analysis
Management is concerned about Denial of Service vulnerabilities in critical assets. In this section, create a filter to identify Denial of Service vulnerabilities in critical assets using CVSS v3 vector information and the Critical Asset tag. Then, create a dashboard widget showing these vulnerabilities.
Part 1: Task 1 - Create a Filter for Denial of Service Vulnerabilities Using CVSSv3 Vectors
Create a fi for Denial of Service vulnerabilities using CVSSv3 vector analysis in Critical vulnerabilities.
Save this fi as “DOS vulns in critical assets.”
Step-by-step Instructions:
1. Ensure you are logged into Tenable Vulnerability Management via cloud.tenable.com with the
credentials provided.
2. Click Menu in the upper left corner.
3. Click Findings underneath Explore .
4. Click Advanced (at the top).
5. In the text bar to the right of Saved Filters , select and clear all text, so that you see only the grayed-out text Enter filter query ,
6. Type CVSSv3 Vector is equal to *A:H* OR CVSSv3 Vector is equal to *A:L* in the Enter fi query text field
7. Press Enter .
8. Click Saved Filters (at the top, to the right of the Filter icon) and click Save . (You may instead see Save
as New , if the previous saved query is still selected.)
9. Type DOS vulns in the text field
10. Click the check mark .
Part 2 - Remediation Analysis
Applying temporary fi or workarounds can be time consuming. In this section, show items where there is only an
oŨcial patch.
Part 2: Task 1 - Create a Filter for OŨcial Fixes for CVSSv3 and CVSSv2
Create a fi using CVSSv3 or CVSSv2 that only shows vulnerabilities where there is an oŨcial fi
Step-by-step Instructions:
1. Click Menu in the upper left corner.
2. Click Findings underneath Explore .
3. Click Advanced (to the right of Saved Filters ).
a. Note: If you are still in the Advanced fi mode from the previous task, click the X to the right
of the query text to clear it. Then, proceed to the next step.
4. Type CVSSv2 Temporal Vector is equal to *RL:OF* OR CVSSv3 Temporal Vector is equal to *RL:O* in the Enter filter query fi and then press Enter .
5. Click Saved Filters .
a. Note: You may see DOS vulns [Edited] instead of Saved Filters . In that case, click that, and then
Save as New .
6. Click Save , and type OŨcial Fixes in the text fi
7. Click the check mark .
Part 2: Task 2 - Identify Vulnerabilities Where There is No Fix
Search for vulnerabilities where there is no fi This information allows you to develop other mitigation
actions to protect assets.
Step-by-step instructions:
1. Click Menu in the upper left corner.
2. Click Findings underneath Explore .
3. Click Advanced (to the right of Saved Filters ).
a. Note: If you are still in the Advanced fi mode from the previous task, click the X to the right
of the query text to clear it. Then, proceed to the next step.
4. Type CVSSv2 Temporal Vector is equal to *RL:U* OR CVSSv3 Temporal Vector is equal to *RL:U* in the Enter fi query fi and then press Enter .
5. Click Saved Filters .
a. Note: If you have continued from the previous task, you may see OŨcial Fixes [Edited] instead
of Saved Filters . In that case, click that, and then Save as New .
6. Click Save , and type Vulnerabilities where there is no fi in the text fi
7. Click the check mark .
Part 3 - Mixed Analysis
In this section, combine multiple items into one fi to look for specific impacts.
Part 3: Task 1 - Create a Filter for VPR Critical Items that Allow for Denial of Service
Identify VPR 9 or higher items that allow for Denial of Service using CVSS v3, and save this as a fi called
Critical Denial of Service Vulnerabilities.
Step-by-step Instructions:
1. Click Menu in the upper left corner.
2. Click Findings underneath Explore .
3. Click Advanced (to the right of Saved Filters ).
a. Note: If you are still in the Advanced fi mode from the previous task, click the X to the right
of the query text to clear it. Then, proceed to the next step.
4. Type VPR is greater than or equal to 9 AND (CVSSv3 Vector is equal to *A:L* OR CVSSv3 Vector is
equal to *A:H* OR CVSSv3 Vector is equal to *A:M*) in the Enter fi query fi and then press Enter .
5. Click the Saved Filters (or the drop-down from the previous saved search).
6. Click Save (or Save as New ), then type Critical Denial of Service Vulnerabilities in the text fi that
appears.
7. Click the check mark .
Part 3: Task 2 - Identify Critical Denial of Service Vulnerabilities Where There is No Fix
Be aware of vulnerabilities that exist where there is no fi so you can take the appropriate remediation
actions.
Step-by-step instructions:
1. Click Menu in the upper left corner.
2. Click Findings underneath Explore .
3. Click the Filter icon, underneath Host Vulnerabilities , to open the Filters panel.
a. If the icon is disabled, click Advanced to toggle back to Basic mode.
4. Click Select Filters .
5. Type CVSS in the Find Filters fi and select the checkbox for CVSSv3 Temporal Vector .
6. Click the X to close the Select Filters box.
7. Locate the CVSSv3 Temporal Vector fi and type *RL:U* underneath is equal to .
8. Click Apply .
9. Click the Saved Filters (or the drop-down from the previous saved search).
10. Click Save (or Save as New ), then type DOS vulns with no fi in the text fi that appears.
11. Click the check mark .
Answer Key
Part1: Task 1
1. Click the VPR until the highest rated VPR item is at the top. Are there vulnerabilities that have a Critical
(i.e., greater than 9) VPR rating?
● Yes
2. Click the fi vulnerability and look at CVSS v3 vector. How can you tell whether this is a High or Low
availability issue?
● Look at the CVSS vector value and look for A:H A:L. If it is A:H, it is High. If it is A:L, it is Low.
Part 2: Task 1
1. What does the acronym RL stand for in the fi
● Remediation Level
2. If you wanted to fi vulnerabilities where there was no fi what would you search on?
● RL:U
Part 2: Task 2
1. What kind of actions could you take when there is no direct remediation available?
● Improved fi protection, Access Control Lists (ACLs) for the asset, or intrusion protection
system (IPS) rules.
2. What other business units might want this information?
● There are several possible answers, including Incident Response, Legal, the CISO and System
Administrators.
Part 3: Task 1
1. Are the vulnerabilities sorted by VPR?
● Not by default.
2. Is there a way to export a report on a single vulnerability in this list?
● Yes, a couple of ways:
i. Click the More (three vertical dots) icon in the Actions column to the far right of the
vulnerability, then select Export.
ii. Select the checkbox to the far left of the vulnerability, then click Export at the top. This
method has the advantage of allowing you to select multiple vulnerabilities as well.
Part 3: Task 2
1. Does this fi identify all Critical Denial of Service vulnerabilities where there is no fi
● No, if the vulnerability has a CVSS v2 but no CVSS v3 value, it will not be identified.
2. How can you identify assets that have Critical Denial of Service vulnerabilities where there is no fi
● Click By Asset, or click the Plugin for a list of affected assets for that plugin.


共有 0 条评论