
Fortigate NGFW Solution
Notes fom FortiGate Lab
NGFW Profile-based Inspection - Intrusion Prevention System
The Fortinet FortiGate NGFW has two inspection modes: Profile-based and Policy-based.
Profile-based NGFW mode is the traditional mode where you create a security profile (antivirus, web filter, and so on) and then apply the profile to a policy.
Fortinet delivers IPS technology with the industry-validated and recognized FortiGate platform.
FortiGate Security Processor Units (SPU) provide unparalleled performance along with FortiGuard Labs' industry-leading threat intelligence creating an IPS solution with proven success in protecting from known and zero-day threats.
In this lab exercise, you will configure a custom IPS sensor, enable IPS inspection on a firewall policy, and verify its effectiveness against an RDP Brute Force attack.
1. Configure IPS Sensor
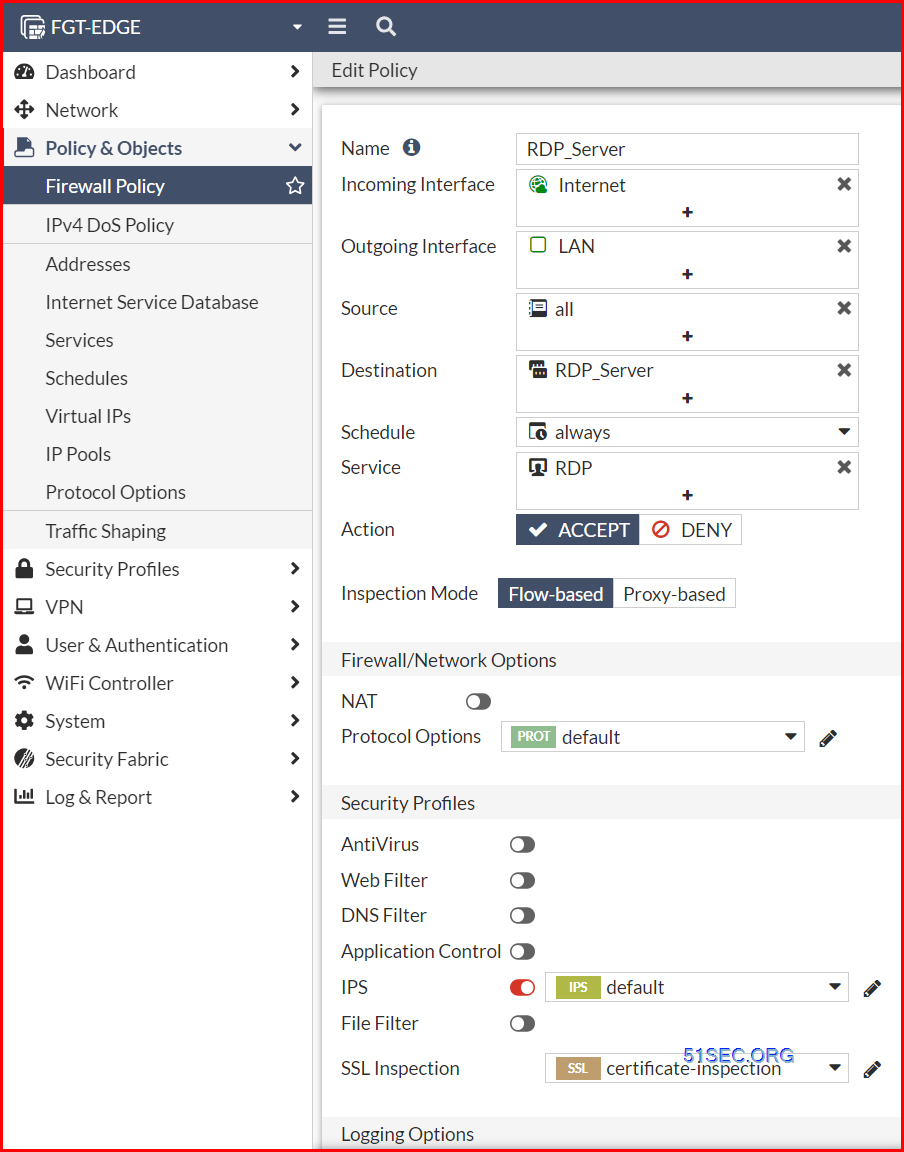
AcmeCorp uses a Windows Server for Remote Desktop access to their network. While this is not considered a best practice, it is vital to their business and needs to be open from the Internet.
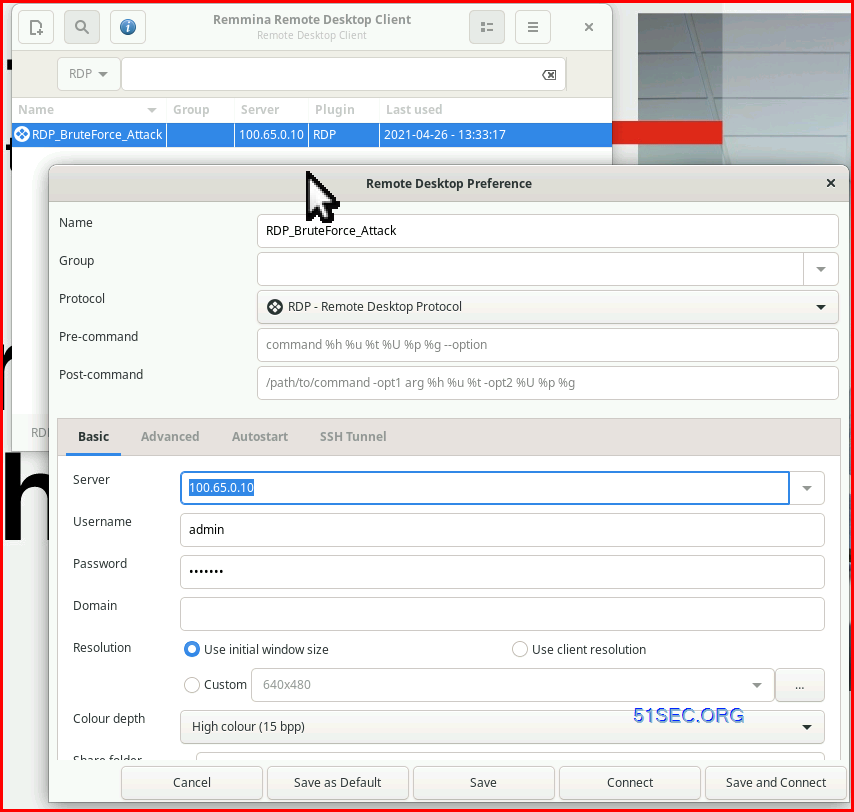
Using the Malware Server, located on the internet, a hacker performs a random port scan and discovers port TCP/3389 is open on the IP address 100.65.0.10 (FGT-EDGE external IP).
Without a valid set of credentials to the server, they will try to brute force an attack to gain access.
Goal
For this objective, we will work on the root FortiGate (FGT-EDGE).
To access the FGT-EDGE, return to the Lab’s main page (Lab Activity Tab) click FGT-EDGE from the sidebar menu and then use the HTTPS option.
Use the following credentials:
Username: admin Password: Fortinet1!
Using the Security Profiles > Intrusion Prevention section, you will need to enable and customize a rate-based IPS signature to block a Microsoft RDP brute force attack and quarantine the attacker’s IP address.
Success
To successfully complete this objective, you will need to edit the IPS sensor profile named ‘default’ and enable the correct rate-based IPS signature.
The signature should initiate a block of the attacker's Source IP address for 10 minutes after multiple RDP brute force requests are launched at a rate of 3 times in 120 seconds by the attacker.
Make sure status changed from disabled or default to enabled
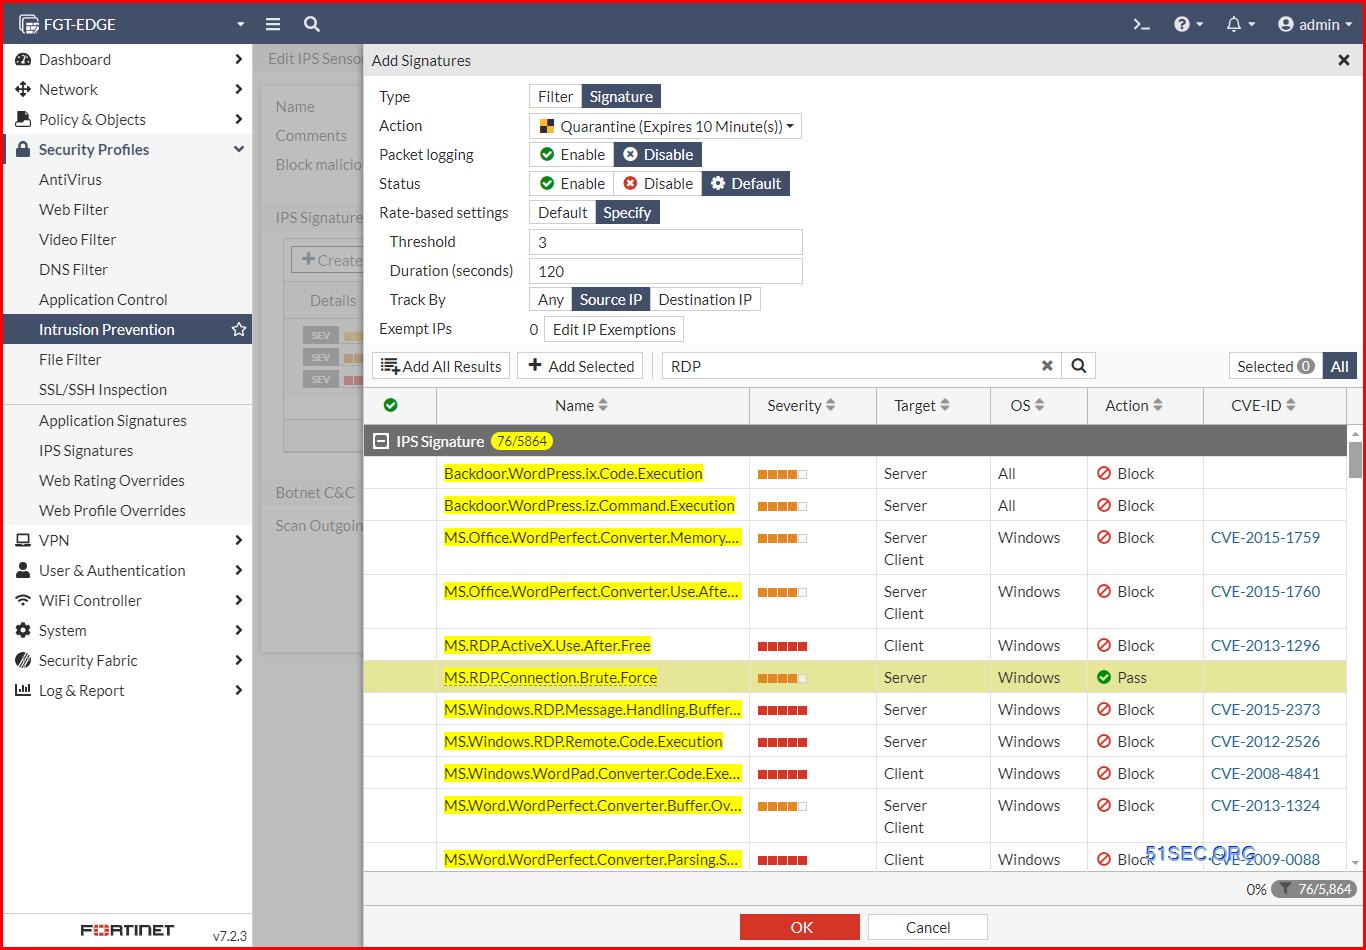
- In the IPS profile ‘default’ click Create New in the IPS Signatures and Filters section.
- Select the following settings:
- Type:
Signature - Action: Quarantine
- Quarantine Duration: 10 minutes
- Packet Logging: Disabled
- Status: Enable
- Rate-based settings: Specify
- Threshold:
3 - Duration (seconds):
120 - Track By: Source IP
- Type:
- In the search field, enter ‘RDP’ and click the search icon.
- Find and select the ‘MS.RDP.Connection.Brute.Force’ signature from the list of results and click the Add Selected button to the left of the search field.
- Click OK to save the filter to the IPS profile.
- Drag the new ‘MS.RDP.Connection.Brute.Force’ filter to the top of the list.
- Click OK again to save the changes to the IPS profile.
2. Apply IPS Sensor to Firewall Policy
3. Execute RDP Brute Force Attack
4. Verify Results
Per Policy Inspection Modes
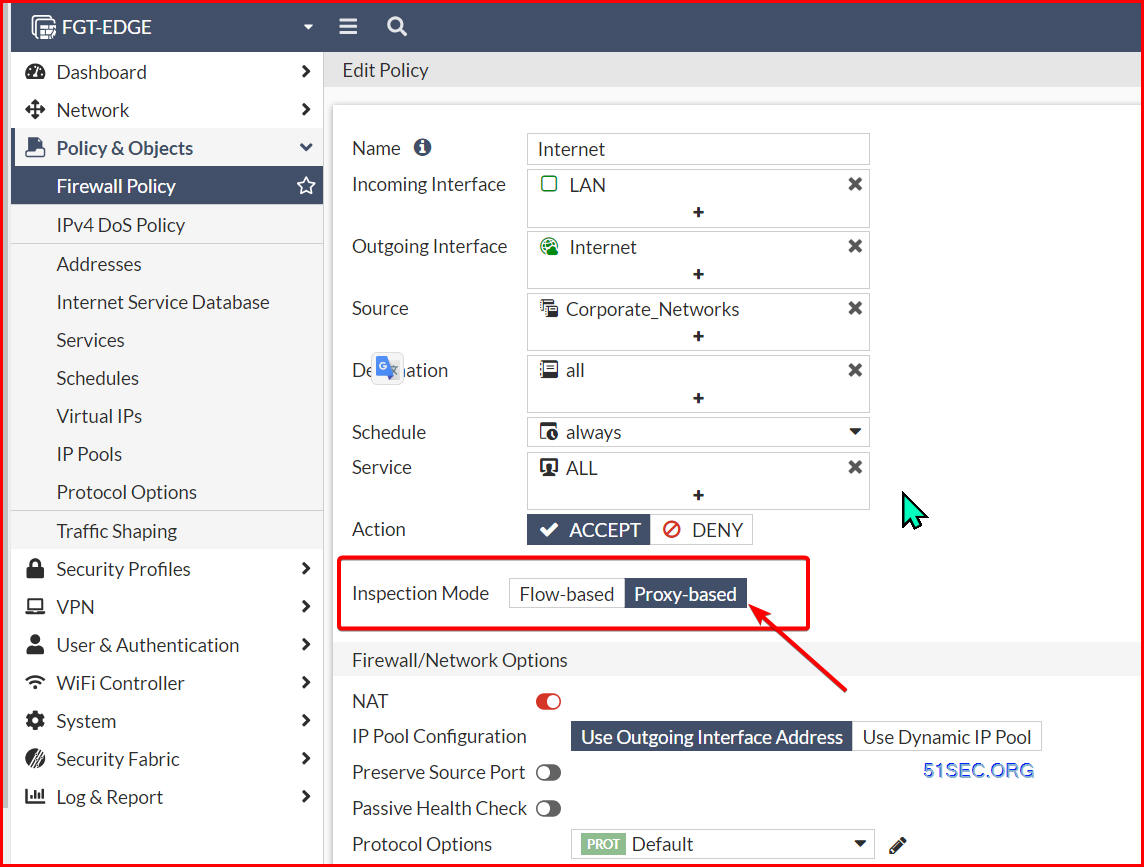
As of FortiOS 6.2, choosing the desired inspection mode (Flow vs Proxy) was made available per IPv4 Policy (called Firewall Policy from FortiOS 6.4). The default inspection mode for a new Firewall Policy is Flow-based as well.
As of FortiOS 6.4, you can set the inspection mode for each UTM profile where both Flow and Proxy inspection modes are available. When creating or modifying Firewall Policies, only the UTM profiles that match the inspection mode of the Firewall Policy will be visible.
Over the next few lab objectives (Objective 2.3 and 2.4), we will be working with UTM profiles that require Proxy-based inspection features. In this lab exercise, you will change the inspection mode for an existing Firewall Policy.
Antivirus CDR & Threat Feeds
Cybercriminals are relentless. Just because one method of attack fails doesn’t mean they’ll simply give up. Since the brute force RDP method was unsuccessful, they may try a more personal or direct approach.
It is often trivial to guess or acquire valid email addresses of corporate employees. Let’s assume that an attacker has obtained the email address of Bob ([email protected]) through one of his contacts. If you remember, Bob is a client sitting at a Windows workstation. Let’s see how you can defend Bob against another type of attack.
In this lab exercise, you’ll enable the Fortinet Content Disarm and Reconstruction (CDR) and Virus Outbreak Prevention features on the FGT-EDGE device. Once enabled, you’ll simulate an attack and verify that the FortiGate is successful in stopping this type of targeted attack.
1 Configure CDR Anti-Virus
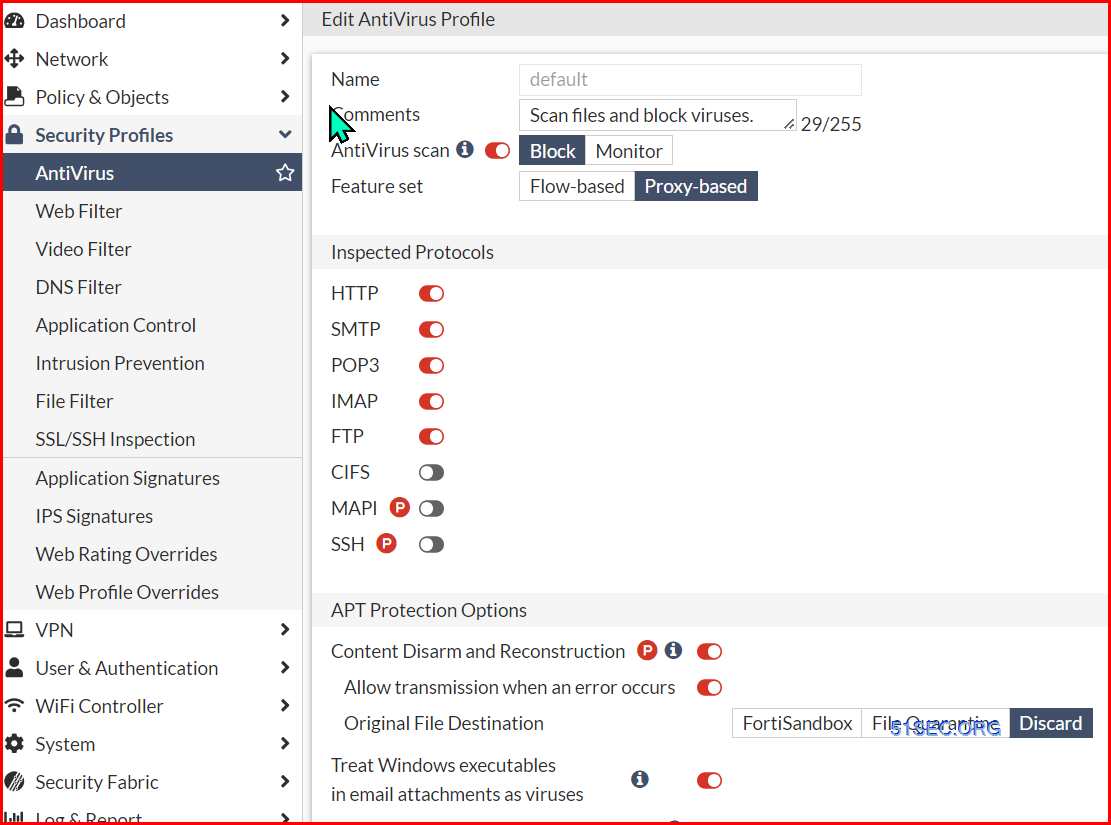
Advanced threats are constantly evolving to find ways around traditional signature-based and reputation-based security prevention measures. The Fortinet Content Disarm & Reconstruction (CDR) service processes all incoming files, disassembles them, and strips all active content from the file in real-time to create a flat and sanitized file to provide to the end user. CDR can fortify your zero-day file protection strategy by proactively removing any possible malicious content from files passing through the FortiGate.
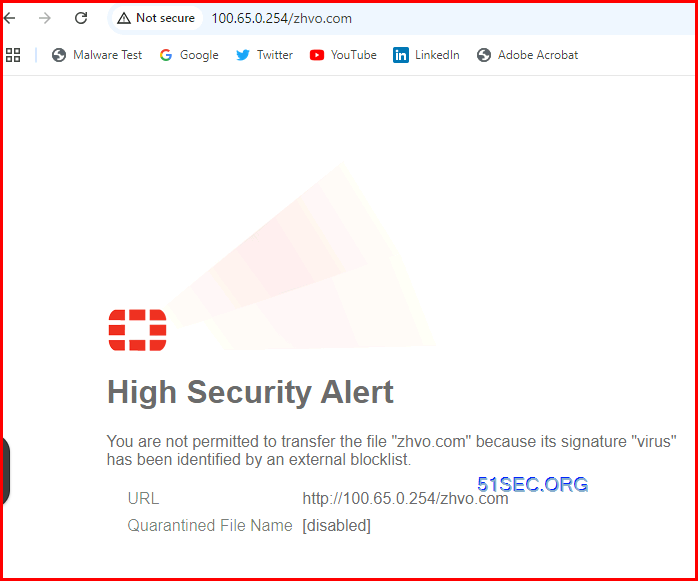
For this objective, we will be working on the FGT-EDGE to enable the Content Disarm and Reconstruction (CDR) feature to sanitize and remove the phishing website link in the ‘Registration Instructions’ PDF file attachment before Bob receives it by email from the attacker.
To complete this objective, you will need to enable Content Disarm and Reconstruction in the ‘default’ antivirus profile.
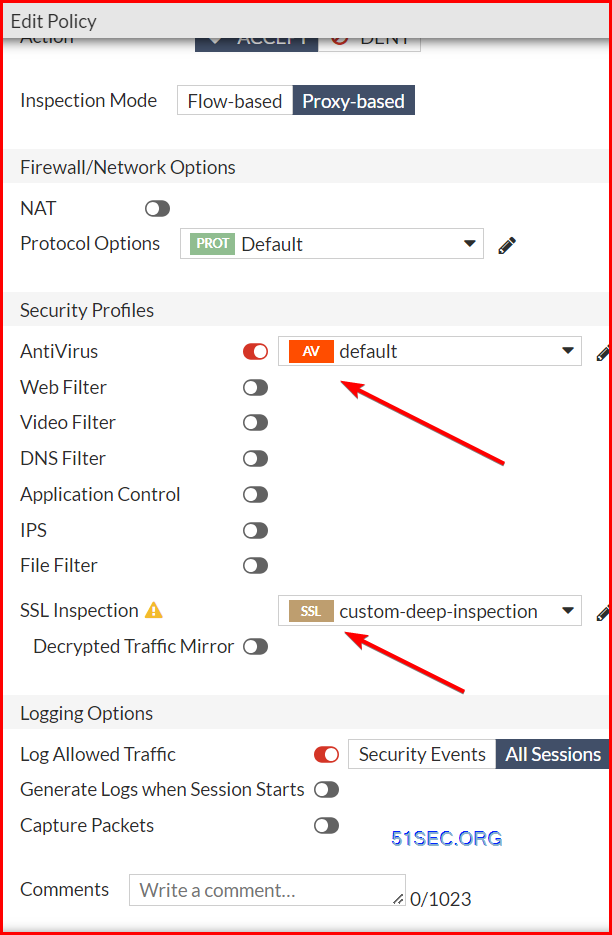
2 Apply Anti-virus profile
Using the Policy & Objects > Firewall Policy section, apply the configured AntiVirus profile to the appropriate firewall policy.
3 Verify by sending malicious file in email
Verify the 'default' AntiVirus profile configuration as follows:
- On the FGT-EDGE device.
- Click on the CLI console (>_) symbol located at the top right.
- Type the following commands:
config antivirus profileedit default - Once in the ‘default’ AntiVirus profile, try to verify the CDR configuration and answer.
config antivirus profileedit defaultconfig content-disarmshow full
4 Configure External Connector
External Block List (Threat Feed) – File Hashes
Threat feed connectors support a list of file hashes and can be used to strengthen the Virus Outbreak Prevention service. This feature allows users to incorporate external third-party dynamic Malware hash block lists into their FortiGate AntiVirus scanning by specifying a URI to an external server.
Goal
For this objective, we will be working on the FGT-EDGE. Using the Security Fabric > External Connectors section, create a Malware Hash Threat Feed to import a malware hash list from an external server into the FGT-EDGE AntiVirus signature database.
Success
To complete this objective, you will need to create a new Malware Hash Threat Feed to import a list of malware hashes from ‘hashfile.txt’ which resides on an external web server (HTTP) with IP address 100.65.0.254.
This web server does not require HTTP basic authentication and any changes made to the external list, should be imported every 1 minute.
Once the External Connector is configured, you will need to make sure that the connector is in an Up/Green state by clicking on the refresh icon.
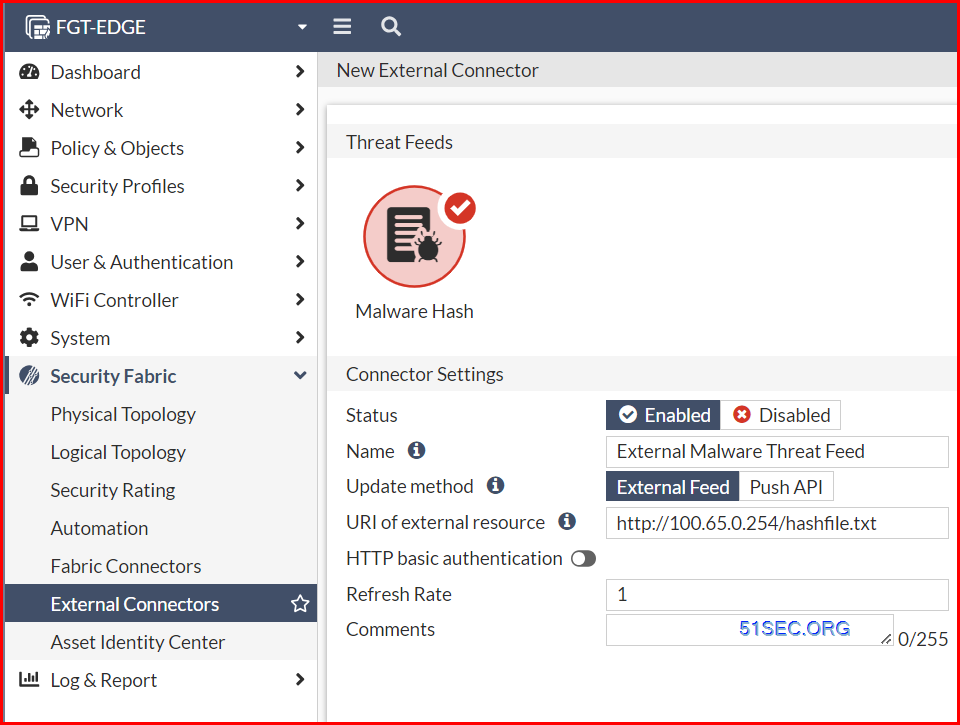
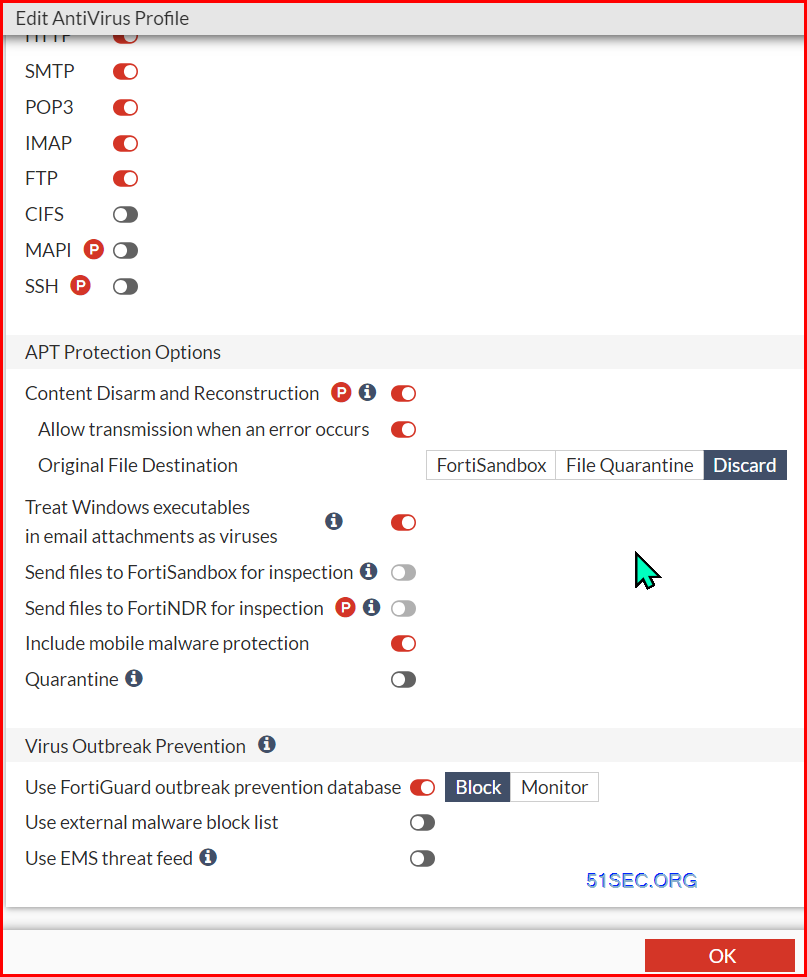
Note: You will need to enable use external mailware block list.
Antomation Stitches
Administrators can define automated workflows, called an Automation Stitch, which use if/then statements to cause FortiOS to automatically respond to an event in a pre-defined fashion.
In brief, an admin can create a 'stitch' defining which 'actions' to take when certain events are 'triggered'. Because this workflow is part of the Security Fabric, automation stitches are configured in the Security Fabric root FortiGate and replicated to all downstream FortiGate devices.
Hint 1
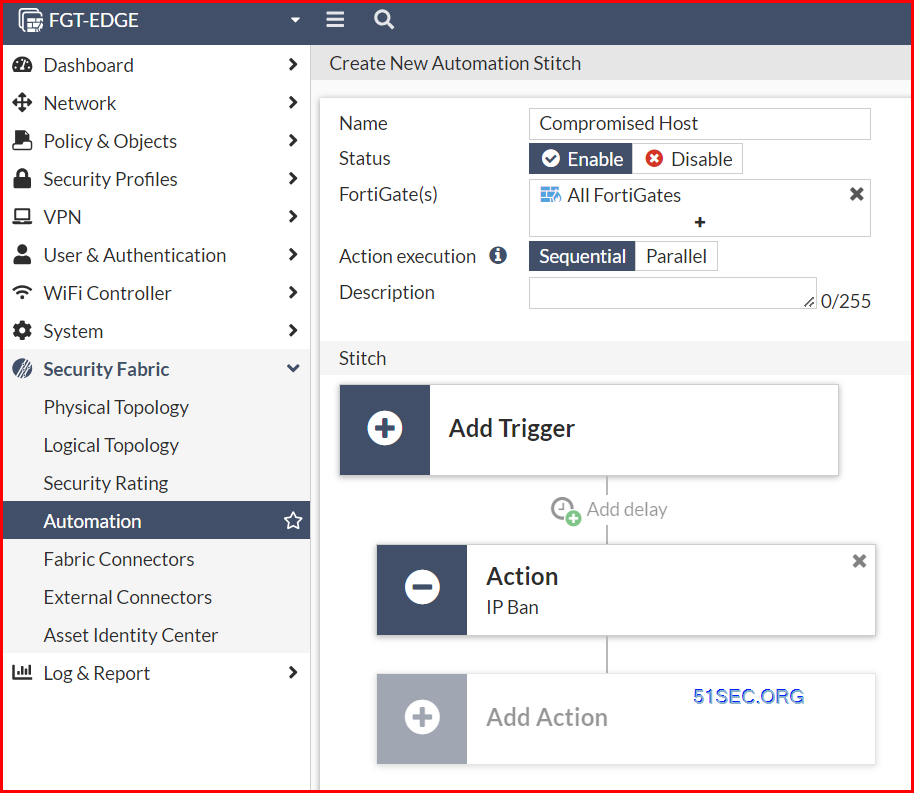
- Go to Security Fabric > Automation.
- Click Create New to create a new Automation Stitch.
- Make the following changes:
- Name:
Compromised Host - Status: Enabled
- FortiGate: All FortiGates
- Click the Add Trigger card.
- In the slide out menu, click the Create button in the upper right corner.
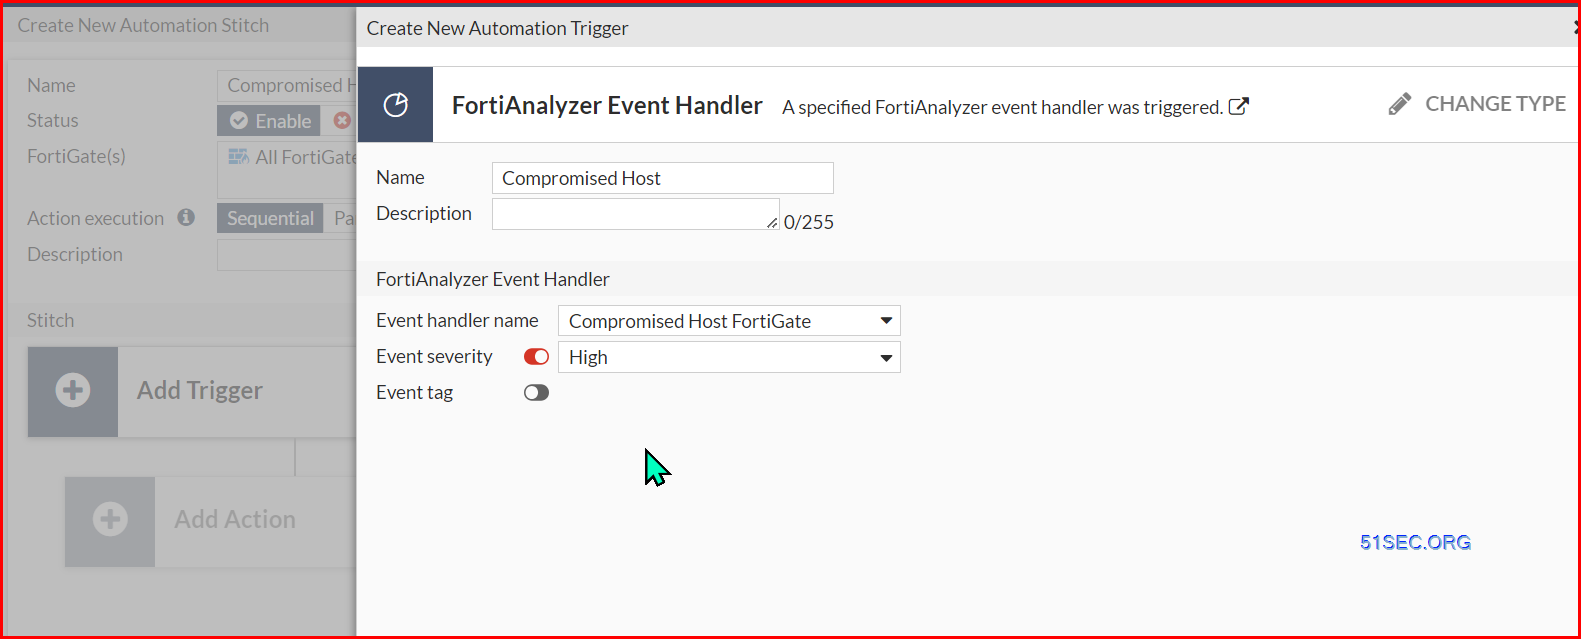
- Click the FortiAnalyzer Event Handler card.
- Make the following changes and click OK.
- Name:
Compromised Host - Event handler name: Compromised Host FortiGate
- Event severity: High
- Click “OK”.
- Select the newly created entry and click Apply.
- Click the Add Action card.
- In the slide out menu, click the Create button in the upper right corner.
- Click the IP Ban card.
- Make the following changes and click OK
- Name:
IP Ban - Click “OK”.
- Select the newly created entry and click Apply.
- Click OK to save the Automation Stitch.
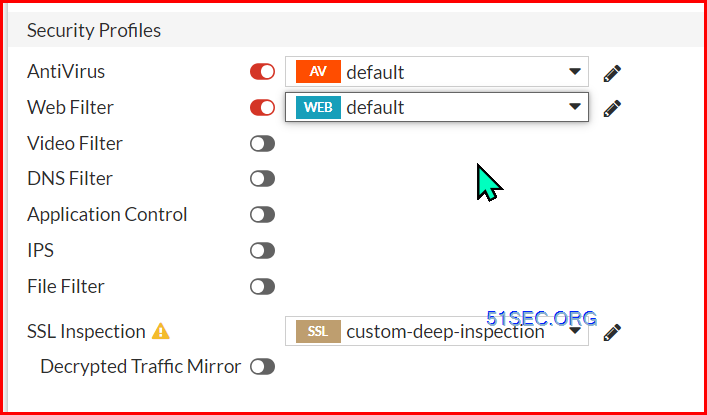
2 Configure Web Filter Profile
3 Execute Malicious BAT file
wget -i hello.txt -t 1 -T 1 -w 1 --spider
4 Verify the results
FortiAnalyzer identifies compromised hosts by checking the logs of each end user against its threat database. When a threat match is found, a threat score is given to the end user. When the check is complete, FortiAnalyzer aggregates all the threat scores of an end user and gives its verdict.
- On the FGT-EDGE, go to Log & Report > Security Events > Web Filter.
- Remove the default 5 minutes log interval by Clicking the X next to Date/Time filter.
- You will see eight blocked events from Bob’s workstation with IP address 172.16.20.51.
- This validates that FortiGate blocked access to these websites because they were identified within the Malicious Websites and Phishing categories.
- Go to Log & Report > System Events.
- Click the General System Events card.
- Remove the default 5 minutes log interval by Clicking the X next to Date/Time filter.
- Change the Interval Time from 5 minutes to 1 hour.
- You will find recent events with the Log Description of ‘Automation stitch triggered’ and the Message of ‘stitch:Compromised Host is triggered’.
This event indicates the Web Filter logs were sent to the FortiAnalyzer which determined the host to be compromised. FortiAnalyzer then sent the ‘Compromised host detected’ alert back to the root FortiGate in the Security Fabric which triggered the Automation Stitch you configured in the previous exercises.
Note: It may take up to 5 minutes for the logs to be sent to FortiAnalyzer and the alert to return to FortiGate.
- Go to the Dashboard > Users & Devices.
- In the Quarantine widget, one system will be listed.
- Click anywhere in the Quarantine widget to expand the results to the full screen.
- Go to Bob’s workstation tab
- Open a browser and try browsing any website (e.g. google.com) to verify the host has been banned from accessing the internet.
- Go back to the FGT-EDGE tab
- In the Quarantine widget, click the Remove All button to remove the IP Ban for Bob’s workstation.
ADVPN
If a customer's head office and branch offices all have two or more internet connections, they can build a dual-hub ADVPN network. Combined with SD-WAN technology, the customer can load-balance traffic to other offices on multiple dynamic tunnels, control specific traffic using specific connections, or choose better-performance connections dynamically.
Before building the VPN topology, a few BGP settings must be configured. In particular, you will need to assign a Local AS and Router ID for the hub and each spoke. To simplify expanding this topology to many more sites, you will also use a Neighbor Group at the hub rather than statically defining each spoke neighbor.
1 Configure BGP
Configure BGP Settings on FGT-EDGE:
- On FGT-EDGE, go to Network > BGP.
- In the Local AS field, enter
65400. - In the Router ID field, enter
0.0.0.101. - Under Neighbor Groups, click Create New.
- Enter the following settings:
- Name:
Branch-Peers - Remote AS:
65400 - Activate IPv4: Enable
- Attribute unchanged: Disable
- Route reflector client: Enable
- Capability: route refresh: Enable
- Click OK.
- Click Apply to save the BGP settings.
- On the Lab Activity Tab, access FGT-BR1, choose the HTTPS option, and log in with the standard credentials:
Username:
adminPassword:Fortinet1! - Go to Network > BGP.
- In the Local AS field, enter
65400. - In the Router ID field, enter
0.0.0.111. - Click Apply to save the BGP settings.
Configure BGP Settings on FGT-BR1:
2 Build IPSec HUB & Spoke VPN
The IPsec VPN Wizard, by default, includes the necessary components to utilize ADVPN when choosing the Hub-and-Spoke template type. In this exercise, you will use the VPN Wizard to build the VPN topology on FGT-EDGE, FGT-BR1, and FGT-BR2.
Configure VPN on FGT-EDGE with the IPsec Wizard:
- On FGT-EDGE, navigate to VPN > IPsec Wizard.
- On the VPN Setup page, use the following settings:
- Name:
Branches - Template type: Hub-and-Spoke
- Role: Hub
- Name:

- Click Next >
- On the Authentication page, use the following settings:
- Incoming Interface: ISP1 (port6)
- Authentication Method: Pre-shared Key
- Pre-shared key:
Fortinet1! - Click Next >
- On the Tunnel Interface page, use the following settings:
- Tunnel IP:
10.10.1.101 - Remote IP/netmask:
10.10.1.1/24 - Click Next >
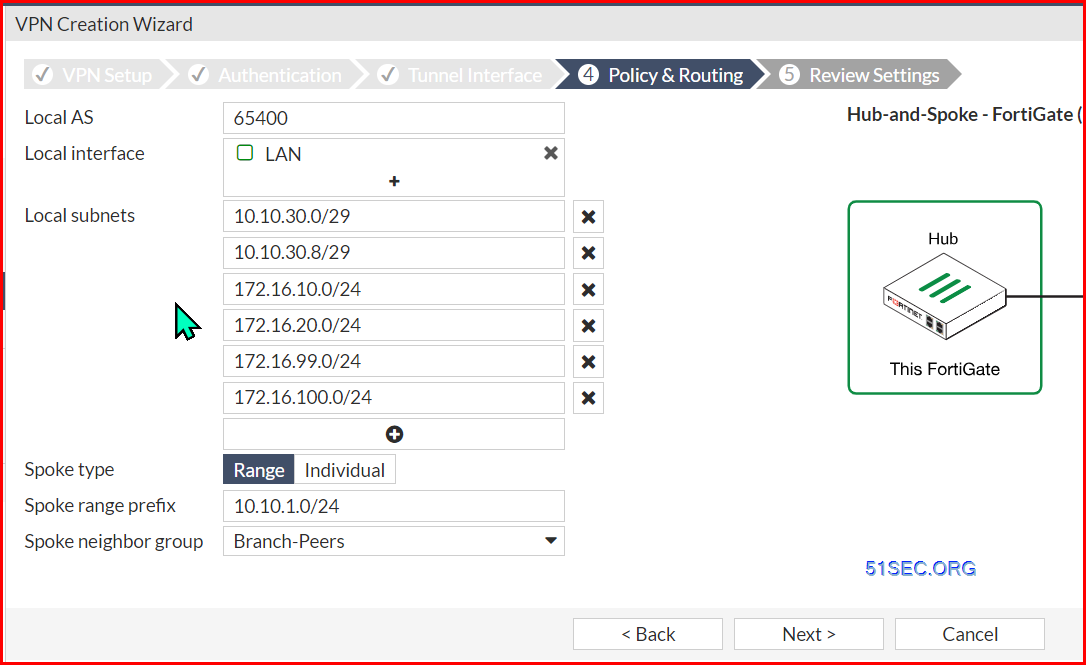
- On the Policy & Routing page, use the following settings:
- Local AS:
65400 - Local interface: LAN
- Local subnets. Click the + button to add more subnets:
10.10.30.0/2910.10.30.8/29172.16.10.0/24172.16.20.0/24172.16.99.0/24172.16.100.0/24
- Spoke type: Range
- Spoke range prefix:
10.10.1.0/24 - Spoke neighbor group: Branch-Peers
- Local AS:
Click next , click create
Under the Spoke Easy Configuration Key, click the Generate Easy Configuration Key button.
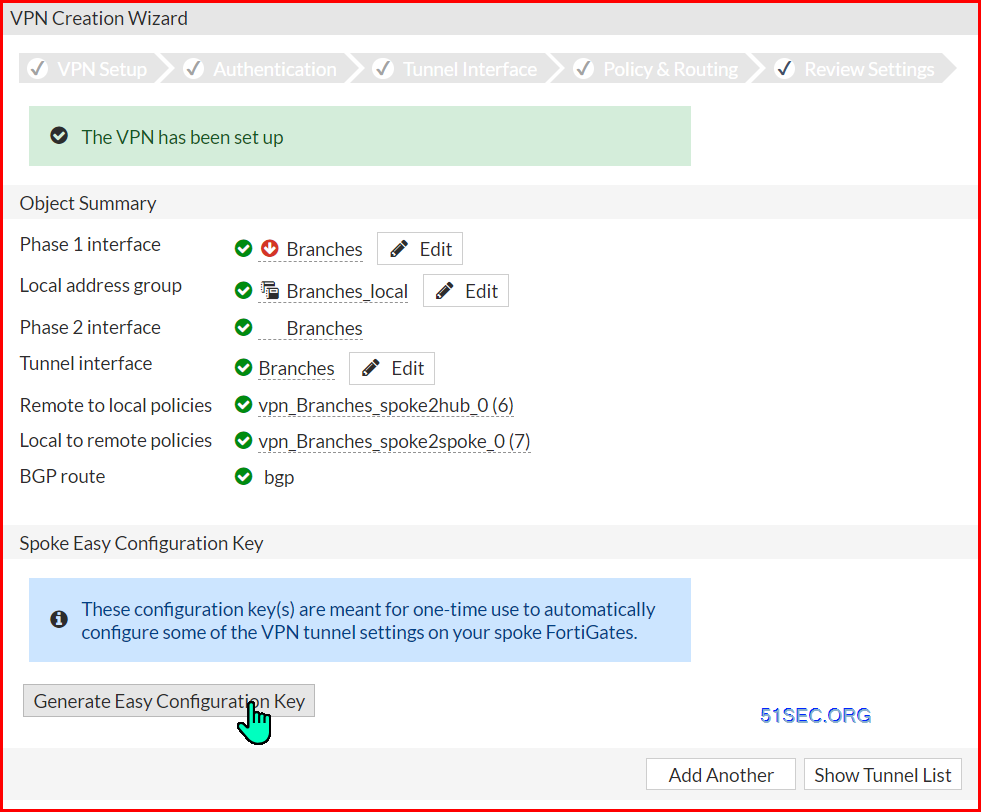
- Create two spoke entries:
- Spoke #1 tunnel IP:
10.10.1.111 - Spoke #2 tunnel IP:
10.10.1.112
- Spoke #1 tunnel IP:
- Click the Generate Easy Configuration Key button.
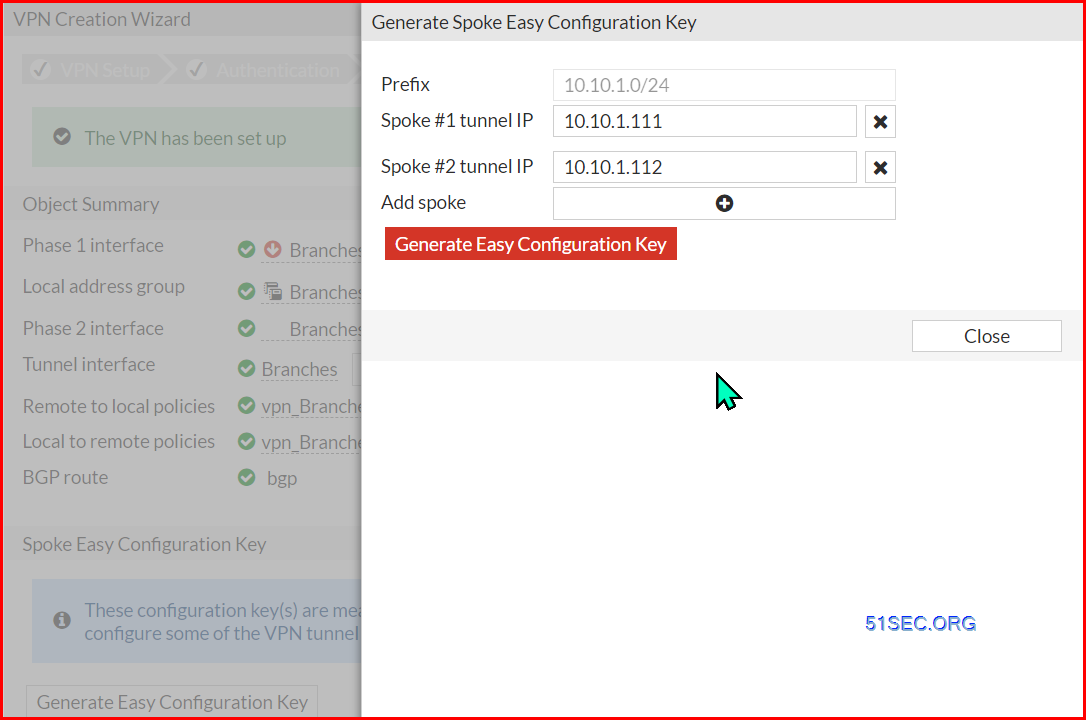
- Click Close.
Configure VPN on FGT-BR1 with the IPsec Wizard:
- On FGT-BR1, navigate to VPN > IPsec Wizard.
- On the VPN Setup page, enter the following settings:
- Name:
Hub - Template type: Hub-and-Spoke
- Role: Spoke
- Easy configuration key: Enter the key you copied in the steps above for 10.10.1.111 and click Apply.
- Name:
On Spoke1
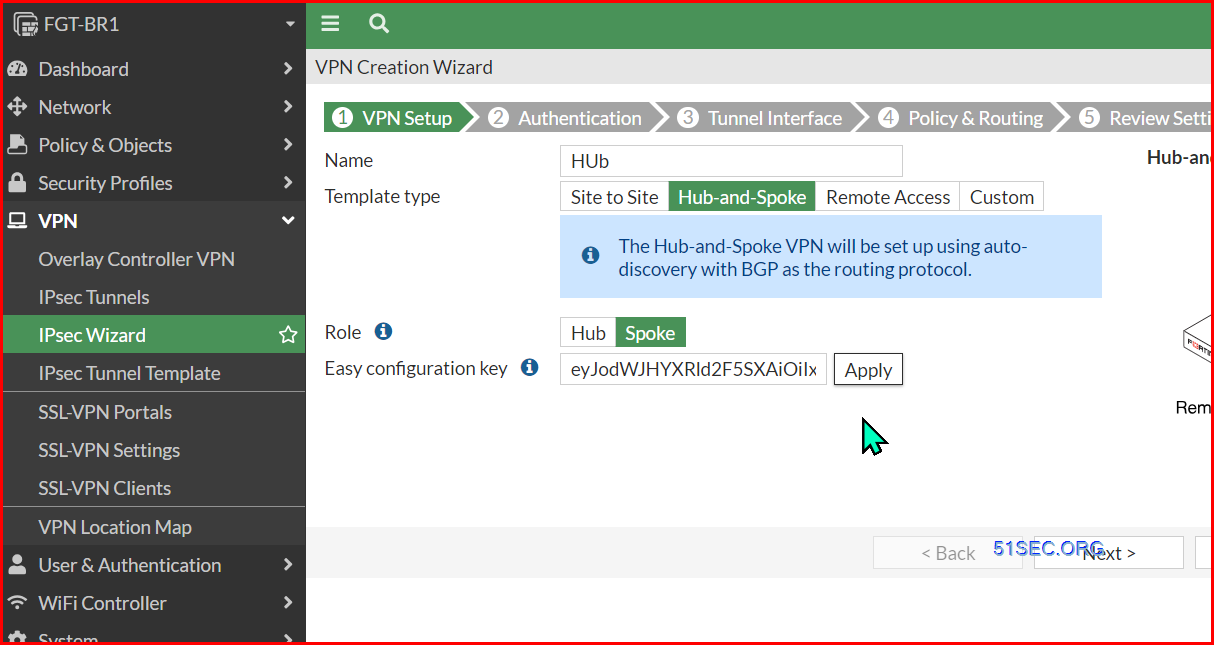
- Click Next >
- On the Tunnel Interface page, verify the following settings:
- Tunnel IP:
10.10.1.111 - Remote IP/netmask:
10.10.1.101/24 - Click Next >
- On the Policy & Routing page, enter the following settings:
- Local AS:
65400 - Local interface: Branch 1 (port4)
- Local subnets:
172.20.1.0/24 - Click Next >
- On the Review Settings page, click Create.
If you would like to learn more about using ADVPN combined with SD-WAN, ask your instructor about the Fast Track Program's Constructing a Secure SD-WAN Architecture workshop.
Organizations' network topologies are significantly impacted as they transition to a digital business model. The adoption of cloud services, the virtualization of the traditional network, and an increasingly mobile workforce accessing applications in the cloud are accelerating advancements in wide-area networking technologies. The traditional wide area network (WAN) is struggling to keep up because it relies on a static infrastructure of devices that can't accommodate shifting, and often temporary resource allocation and workloads.
Participants who attend this workshop will learn how to:
- Apply software-defined networking (SDN) to wide-area networks in an enterprise environment
- Implement application control and traffic shaping over SD-WAN
- Use FortiManager to enable unified policy across multiple enterprise branches
- Configure virtualized products supporting WAN aggregation while gaining hands-on experience
- Combine the redundancy of SD-WAN with the full mesh capabilities of ADVPN for a highly dynamic enterprise WAN solution.
NGFW Policy-based Inspection
Policy-based NGFW mode allows administrators to add applications and web filter categories directly to a Security Policy without having to first create and configure an Application Control or Web Filter profile.
When Policy-based NGFW mode is enabled, the FortiGate will automatically be configured to use Central NAT and Flow-based inspection security profiles. These two modes combine to make administrating a FortiGate simple and easy while providing high performance.
In the following set of exercises, we will explore a FortiGate (FGT-EDGE) configured in Policy-based NGFW mode and configure policies to protect end users and enforce company policies.
In a traditional hub-and-spoke VPN topology, all traffic from one spoke to another travels entirely through the hub. In an ADVPN configuration, the first packet is sent through the Hub at which point the Hub coordinates with each Spoke to build the shortcut tunnel and update the dynamic routing table for each spoke allowing them to communicate directly.
In this exercise, you will use ICMP traffic between a host at Branch_1 to a host at Branch_2 to trigger the ADVPN shortcut tunnel creation, monitor the packet flow, and finally teardown the shortcut tunnel manually.
1 Goal
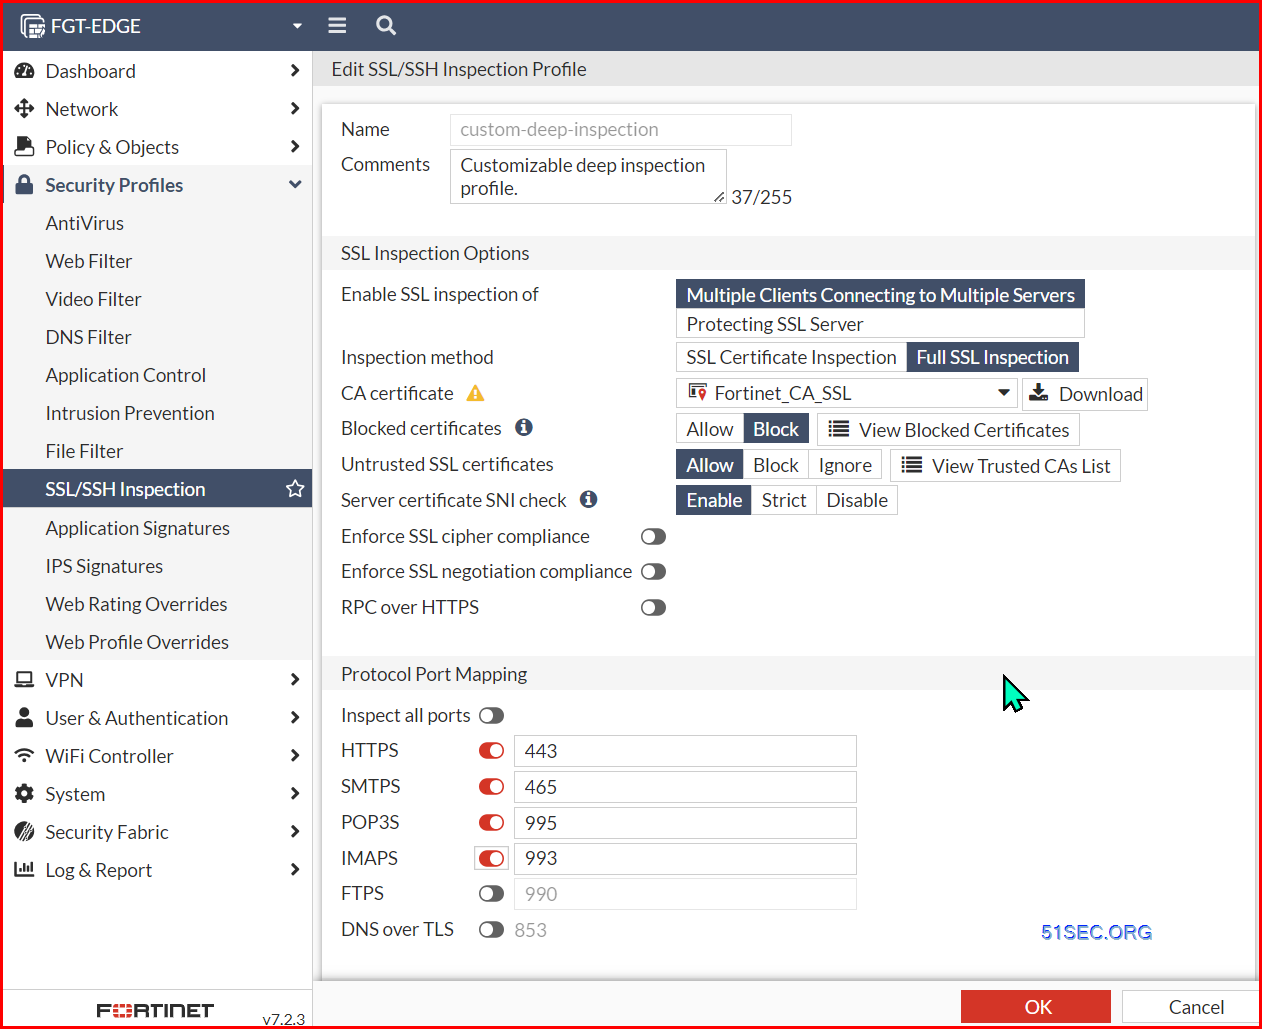
Enable SSL Deep Packet Inspection to inspect encrypted network traffic.
2 Make sure system is in Policy-based.
go to System > Settings section and verify that NGFW Mode is set to Policy-based.
3 Configure SSL/SSH Inspection Profile
To complete this objective, you'll need to enable SSL Inspection on HTTPS, SMTPS, POP3S, and IMAPS ports using the 'custom-deep-inspection' SSL/SSH inspection profile.
After you have configured the SSL/SSH Inspection profile, go to Policy & Objects > SSL Inspection & Authentication. Click and Edit LAN-WAN policy to verify if the correct SSL Inspection profile ‘custom-deep-inspection’ has been applied for encrypted network traffic inspection.
4 Configure NGFW Policy to Block Applications
References
For continued learning about the FortiGate NGFW product utilized in this workshop, please consider looking at the following NSE training courses:
- FCA Cybersecurity certification including the following courses:
- FCP Network Security certification including the following courses:
- FCP Security Operations certification including the following courses:
Additional resources and tools can be found at the following locations:
Ask your instructor for more information about the following Fast Track workshops:
- Constructing a Secure SD-WAN Architecture
- SD-Branch: LAN Edge Wired and Wireless
- Creating a Comprehensive Fortinet Security Fabric
- What’s New in FortiOS?
共有 0 条评论