
No VPS, No Server, Running A Linux VM in Your Browser
In this post, I am gonna introduce to you a very interesting project called WebVM. This project is a real "black technology". It allows user to run a full functional Linux operating system inside your browser. Not only you can run all linux commands, also it can compile programs, execute 32-bit x86 binaries, etc. , no need to set any infrastructure on server, or lab environment, just open the URL to use immediately. You can also deploy services including custom files and libraries according to personal needs.
WebVM is a server-less virtual environment running fully client-side in HTML5/WebAssembly. It's designed to be Linux ABI-compatible. It runs an unmodified Debian distribution including many native development toolchains.
WebVM is powered by the CheerpX virtualization engine, and enables safe, sandboxed client-side execution of x86 binaries on any browser. CheerpX includes an x86-to-WebAssembly JIT compiler, a virtual block-based file system, and a Linux syscall emulator.
WebVM: Online Demo
From WebVM's GitHub page , we can find its Demo link. Click in and you can operate Linux commands directly on the browser.
- https://webvm.io/
- https://webvm.io/alpine.html
WebVM also has some commonly used built-in development tools, such as Python, gcc, etc. We can simply test it by compiling a Hello World C file in it, or use Python to run a Fibonacci sequence to experience the feeling of writing a program in the browser.
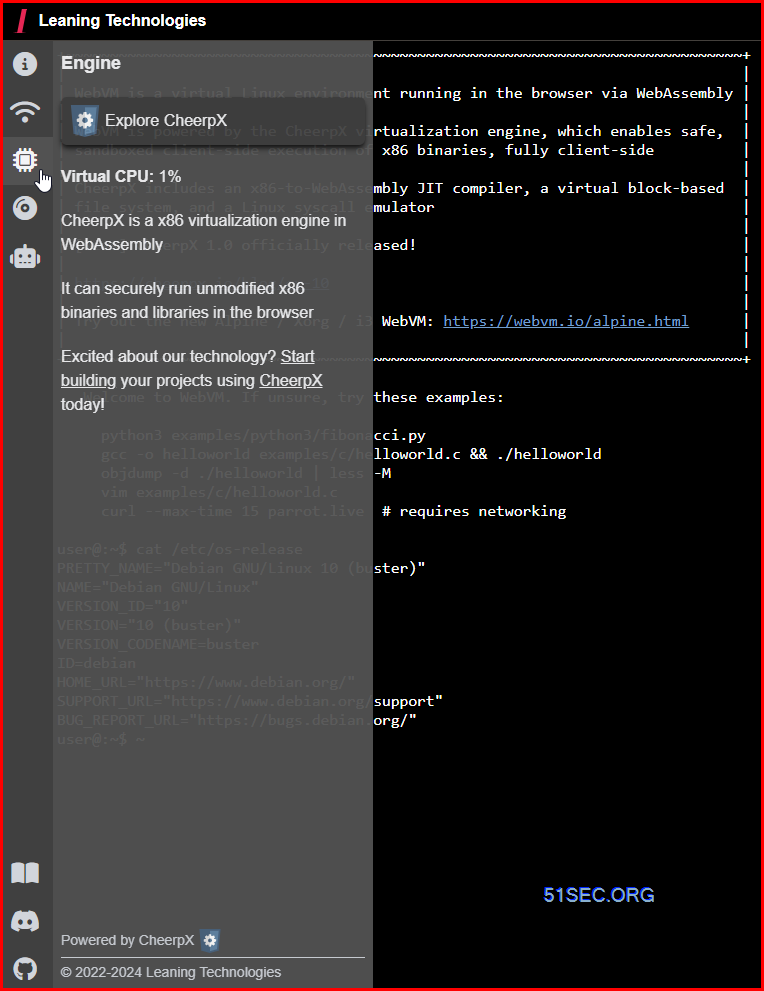
You also can run a demo which has Alpine Linux with desktop to run some GUI applications and games.
Create Your Own Webvm in Github
1 Fork the repository.
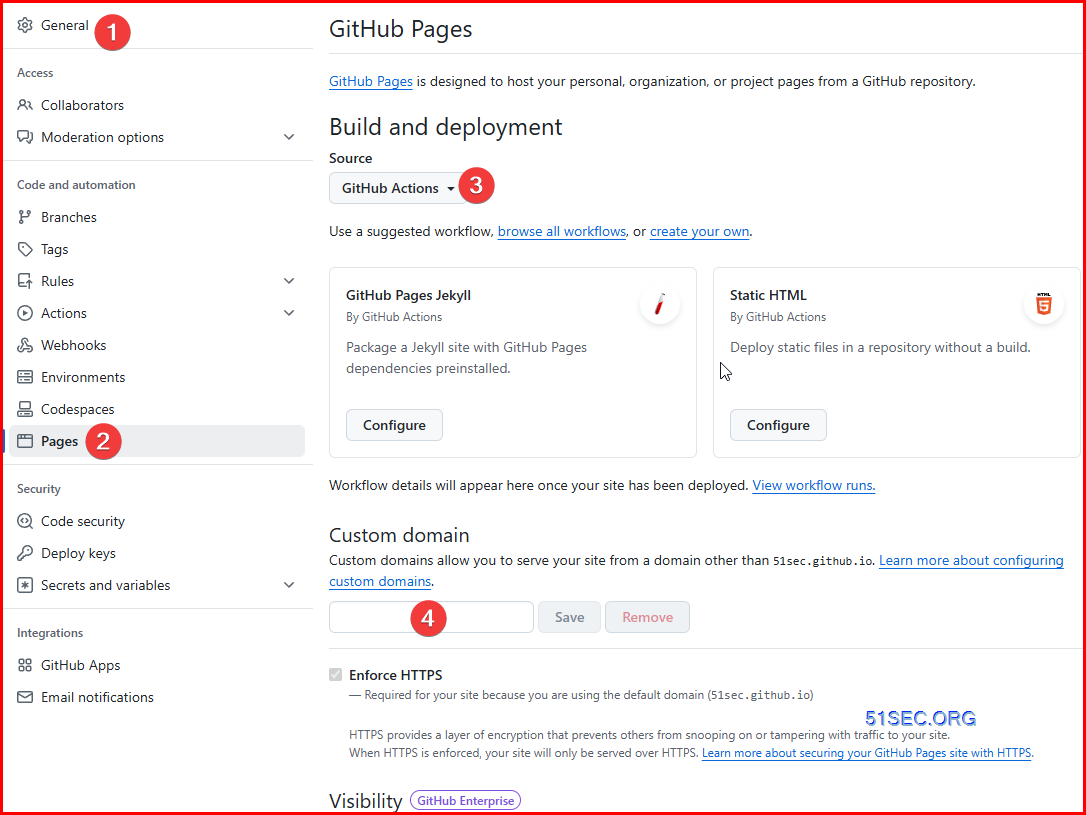
2 Enable Github pages in settings.
- Click on
Settings. - Go to the
Pagessection. - Select
Github Actionsas the source. - If you are using a custom domain, ensure
Enforce HTTPSis enabled.
3 Run the workflow.
- Click on
Actions. - Accept the prompt. This is required only once to enable Actions for your fork.
- Click on the workflow named
Deploy. - Click
Run workflowand then once moreRun workflowin the menu.
4 After a few seconds a new Deploy workflow will start, click on it to see details.
5 After the workflow completes, which takes a few minutes, it will show the URL below the deploy_to_github_pages job.
Linux Commands:
- $ cat /etc/os-release
- $ lsb_release -a
- $ hostnamectl
Local Deployment (Your Own Server or VPS)
1 Clone the project
- git clone https://github.com/leaningtech/webvm
- cd webvm
- wget https://github.com/leaningtech/webvm/releases/download/ext2_image/debian_large_20230522_5044875331.ext2
- I am using large one as an example. You can choose mini one.
config_github_terminal.js- Uncomment the default values for
CMD,ARGS,ENVandCWD - Replace
IMAGE_URLwith the URL (absolute or relative) for the Ext2 image. For example"/debian_mini_20230519_5022088024.ext2"

npm, output will be placed in the build directoryapt install npmnpm installnpm run build
build directory just creatednginx -p . -c nginx.conf
apt install screen
screen -S ng
nginx -p . -c nginx.conf
ctrl + A + D (detach from the screen, going back to original session)
http://127.0.0.1:8081 and enjoy your local WebVM
user@:~$ su Password: password root@:/home/user#
Enable HTTPS with Custom Domain
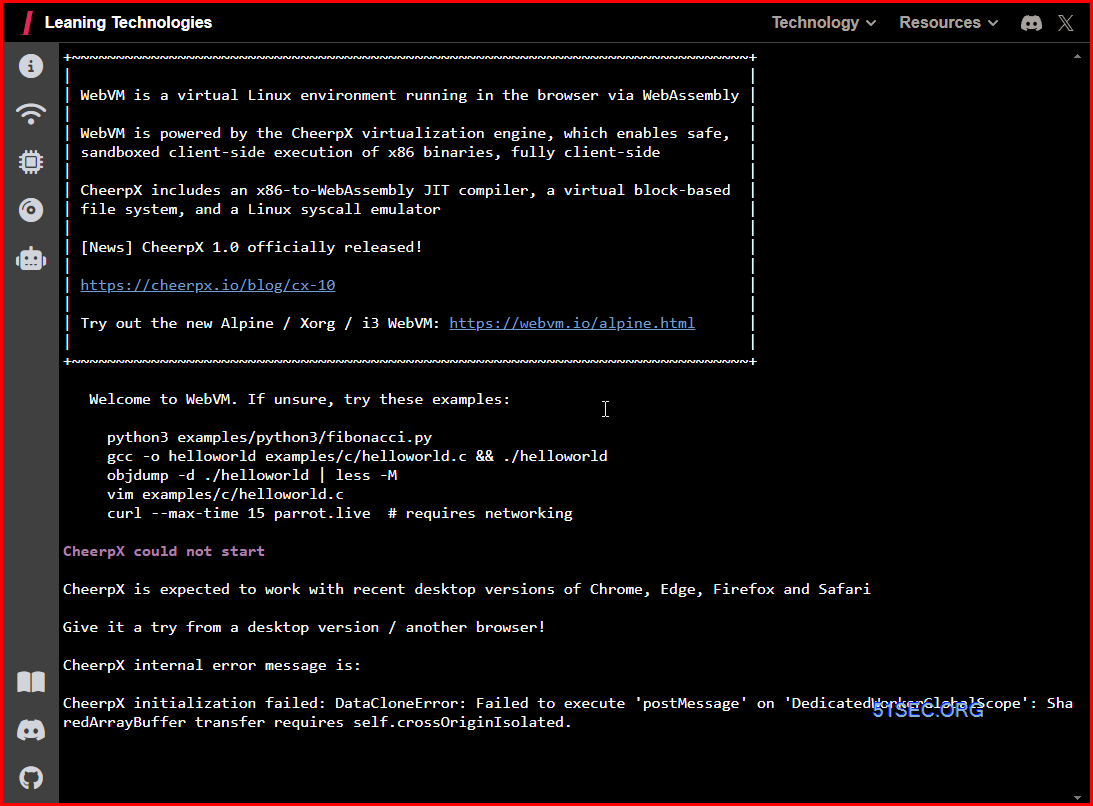
+~~~~~~~~~~~~~~~~~~~~~~~~~~~~~~~~~~~~~~~~~~~~~~~~~~~~~~~~~~~~~~~~~~~~~~~~~~~~~+
| |
| WebVM is a virtual Linux environment running in the browser via WebAssembly |
| |
| WebVM is powered by the CheerpX virtualization engine, which enables safe, |
| sandboxed client-side execution of x86 binaries, fully client-side |
| |
| CheerpX includes an x86-to-WebAssembly JIT compiler, a virtual block-based |
| file system, and a Linux syscall emulator |
| |
| [News] CheerpX 1.0 officially released! |
| |
| https://cheerpx.io/blog/cx-10 |
| |
| Try out the new Alpine / Xorg / i3 WebVM: https://webvm.io/alpine.html |
| |
+~~~~~~~~~~~~~~~~~~~~~~~~~~~~~~~~~~~~~~~~~~~~~~~~~~~~~~~~~~~~~~~~~~~~~~~~~~~~~+
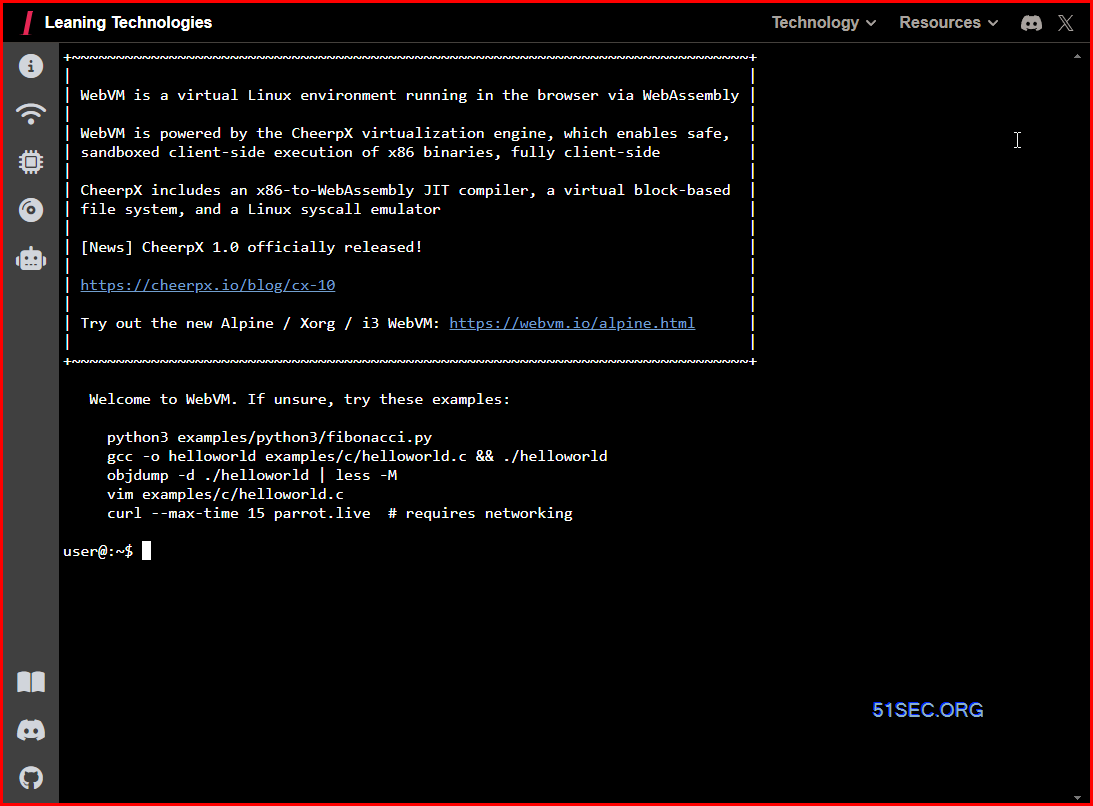
Welcome to WebVM. If unsure, try these examples:
python3 examples/python3/fibonacci.py
gcc -o helloworld examples/c/helloworld.c && ./helloworld
objdump -d ./helloworld | less -M
vim examples/c/helloworld.c
curl --max-time 15 parrot.live # requires networking
CheerpX could not start
CheerpX is expected to work with recent desktop versions of Chrome, Edge, Firefox and Safari
Give it a try from a desktop version / another browser!
CheerpX internal error message is:
CheerpX initialization failed: DataCloneError: Failed to execute 'postMessage' on 'DedicatedWorkerGlobalScope': SharedArrayBuffer transfer requires self.crossOriginIsolated.
Based on faq https://cheerpx.io/docs/faq,
If you encounter the following error message:
Uncaught CheerpX initialization failed: DataCloneError: DedicatedWorkerGlobalScope.postMessage: The SharedArrayBuffer object cannot be serialized. The Cross-Origin-Opener-Policy and Cross-Origin-Embedder-Policy HTTP headers can be used to enable this.
This error occurs because CheerpX relies on SharedArrayBuffer , which requires the site to be cross-origin isolated. To activate cross-origin isolation, ensure your site is served over HTTPS and include the following headers in your responses:
We will enable a custom domain and make it working over https.
Cloudflare add an A record.
NPM add a new proxy host with https enabled.
Now it should be working as shown below.
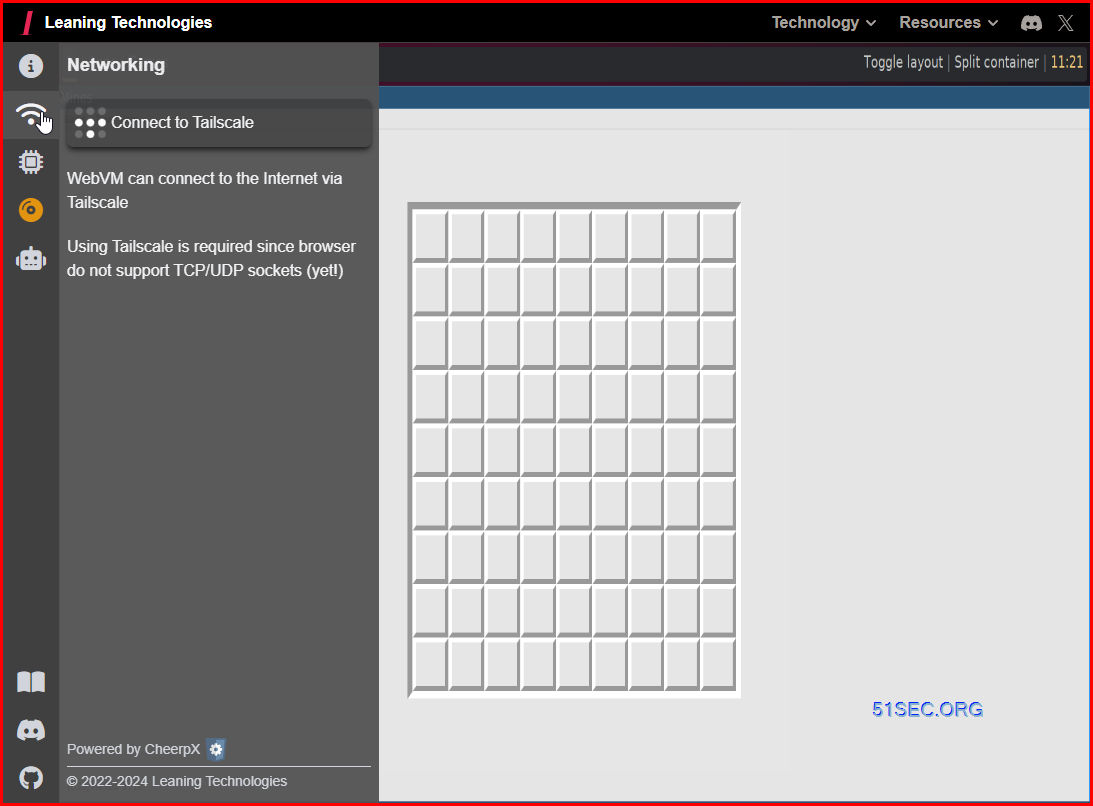
Enable Networking
Modern browsers do not provide APIs to directly use TCP or UDP. WebVM provides networking support by integrating with Tailscale, a VPN network that supports WebSockets as a transport layer.
- Open the "Networking" panel from the side-bar
- Click "Connect to Tailscale" from the panel
- Log in to Tailscale (create an account if you don't have one)
- Click "Connect" when prompted by Tailscale
- If you are unfamiliar with Tailscale or would like additional information see WebVM and Tailscale.
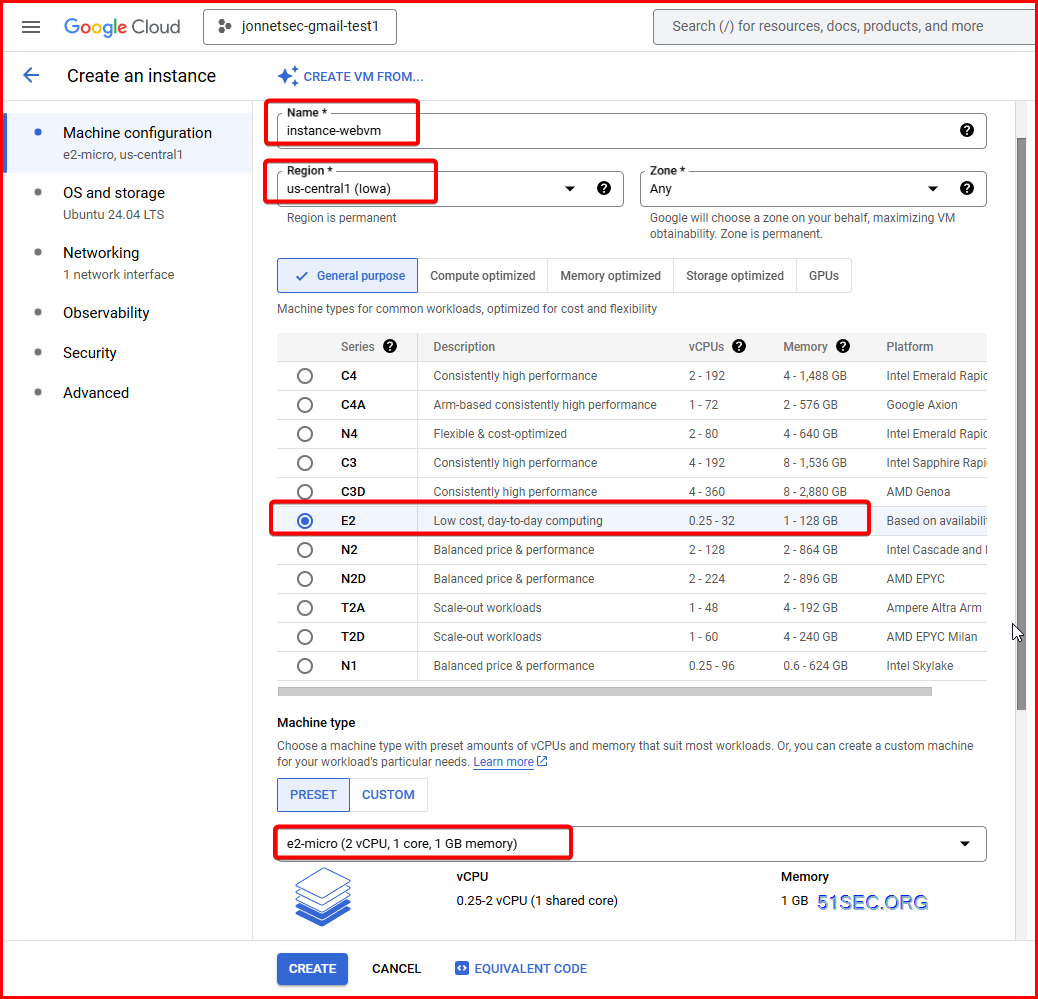
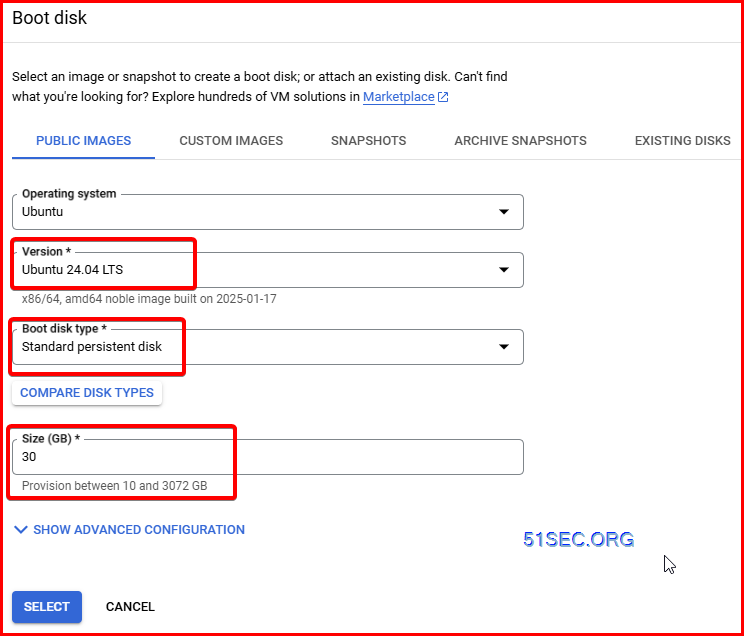
Free GCP Instance
Requirements for Free Tier Compute Engine
- 1 non-preemptible
e2-microVM instance per month in one of the following US regions:- Oregon:
us-west1 - Iowa:
us-central1 - South Carolina:
us-east1
- Oregon:
- 30 GB-months standard persistent disk
- 1 GB of outbound data transfer from North America to all region destinations (excluding China and Australia) per month
Videos
References
- https://the-walking-fish.com/p/webvm/
共有 0 条评论